Enriching Records with LookupRecord & REST APIs in NiFi
This is a pattern I have seen quite frequently, especially in IoT flows. At a high level: we have a stream of sensor data coming in from our IoT devices, and an external service that contains additional contextual data exposed via a REST API. With every sensor message, we want to call the REST API, passing some of the sensor information along, and recieve some additional related information in response.
This isn’t a particularly complex flow and it can be successfully implemented in several different ways. However, not all implementations are equal, so I’m going to demonstrate how to create this flow in a clean, efficient and maintainable way. Also, as I need a REST API to demonstrate the flow, I’ll build a quick REST API inside NiFi to fulfill that, which I’ll talk about in another post.
To Record or not to Record?
The most common ‘mistake’ I see when implementing this flow is one that is quite prevelent in NiFi. That ‘mistake’ is not utilising NiFi’s Record capabilities. This is a hugely powerful feature of NiFi that completely changes how a flow is implemented. It’s more efficient, it’s neater, it’s easier to debug and easier to maintain.
NiFi is designed to work with streams, and as such there does not need to be this 1:1 relationship of FlowFile to message. Instead, we can far more efficiently process a FlowFile that contains hundreds, even thousands, of messages at a time. We do this using Records. A Record can be any kind of message that can be defined by a Schema (even if you don’t provide a Schema yourself) - a piece of JSON, some XML, a row in a CSV, an Avro message.
None of this is specific to IoT, but it’s a good example. Most sensors are sending out a series of small, consistent, well-formatted messages. If we only had 1 sensor sending a message every 5 seconds, it wouldn’t really matter too much - but if we were to scale to multiple thousands of sensors, we end up having to deal with thousands of messages arriving at any one point in time, all the time. A continuous stream of messages.
Generating Test Data
I do not have a fleet of several thousands IoT devices, so I will be using GenerateFlowFile to produce messages instead. In the real world, you might be using MiNiFi to consume events at the edge and/or utilising some form of centralised message bus, like Kafka.
I will use some Expression Langauge in the GenerateFlowFile to give us some random variance to messages so that we can do some routing logic in the API. My GenerateFlowFile settings are kept default, with the Custom Text field set to:
{
"someInt": "${random()}",
"someUUID": "${UUID()}",
"query": "${random():mod(2):equals(0):ifElse('val1','val2')}"
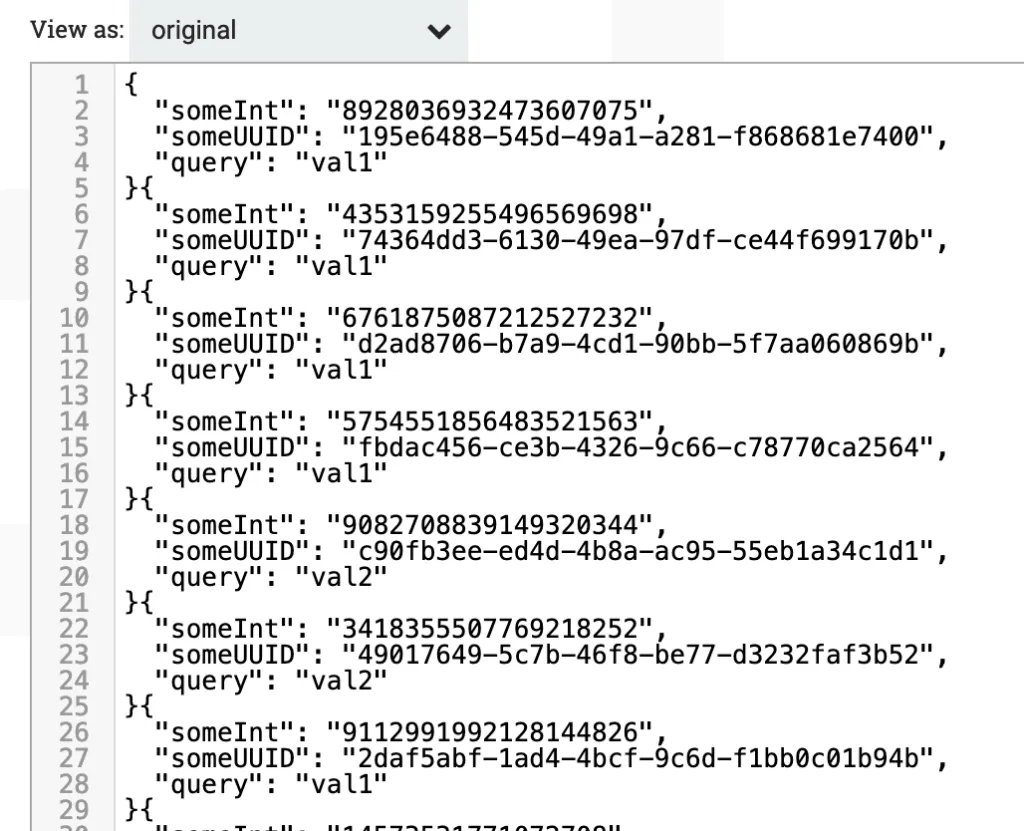
}Which gives me messages that look like this:
{
  "someInt": "3557167745430046240",
  "someUUID": "cc93197a-5393-470b-8057-c4ef79c811b8",
  "query": "val1"
}
Where someInt is a random number, someUUID is a random UUID string and query is one of either val1 or val2.
Turning on this GenerateFlowFlow will give us individual FlowFiles with a single message in each. However, we want to simulate multiple message per FlowFile - imagine we are consuming from Kafka with a batch size of 1000. So let’s merge some FlowFiles using a MergeContent processor. This will result in fewer FlowFiles with many messages in each. Note that we could also use a MergeRecord here, which would accurately reflect the output of say, a ConsumeKafkaRecord processor.
I am keeping most settings at default, only changing Minimum Number of Entries to 200 and the Max Bin Age to 2 seconds.
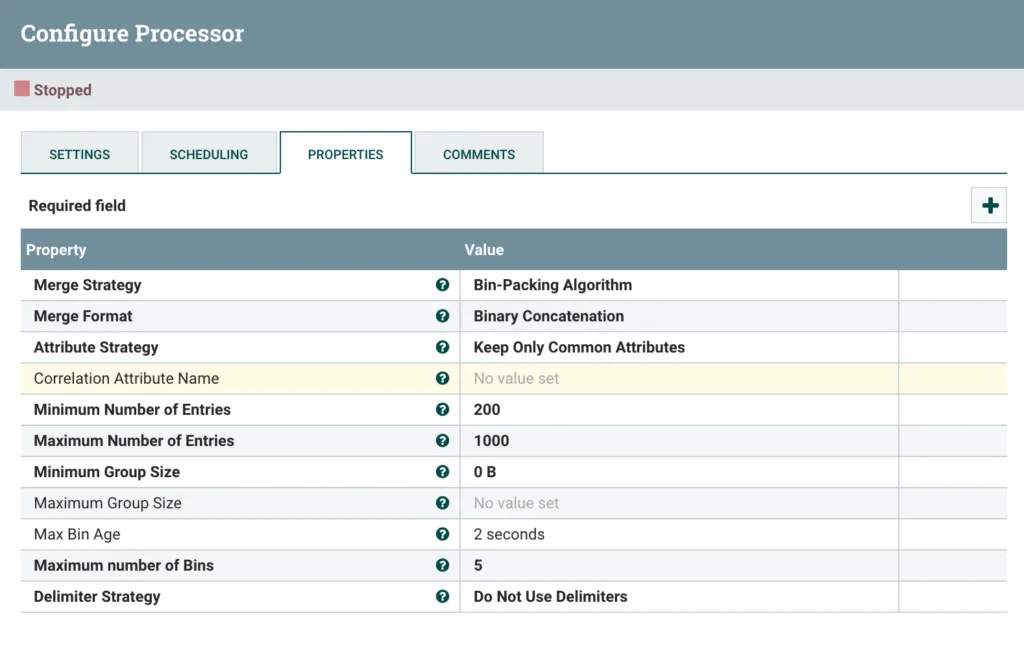
Configured MergeContent
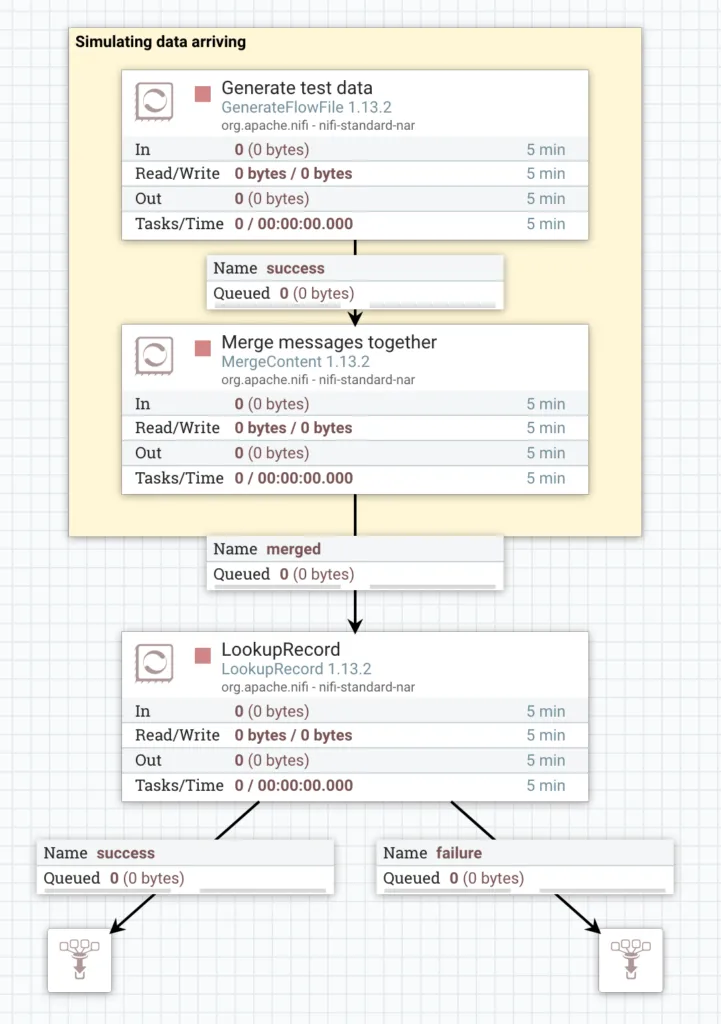
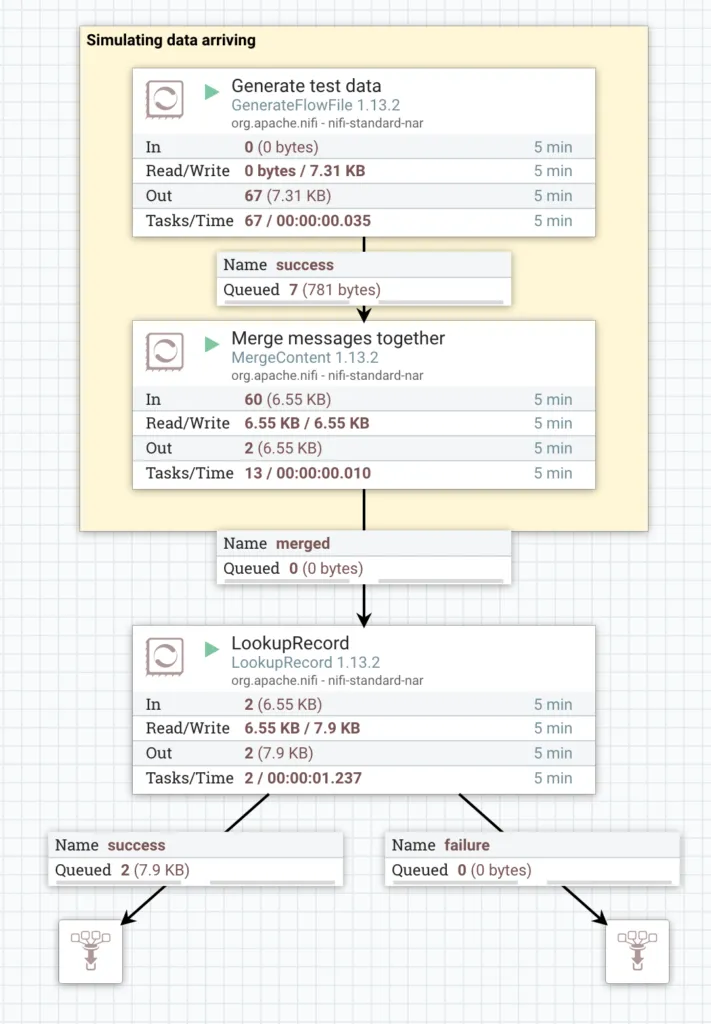
Now connect those 2 processors together and we are done with the traffic simulation. Remember, in reality you wouldn’t need this bit, it’s just for testing purposes. In the screenshot below you can see I have connected the Success relationship from the GenerateFlowFile to the MergeContent. Then I have connected the Merged relationship from the MergeContent to a funnel. The funnel is just so we can test this part of flow now and we will delete it later. I wrap the processors in a Label block to help make the flow easier to understand.
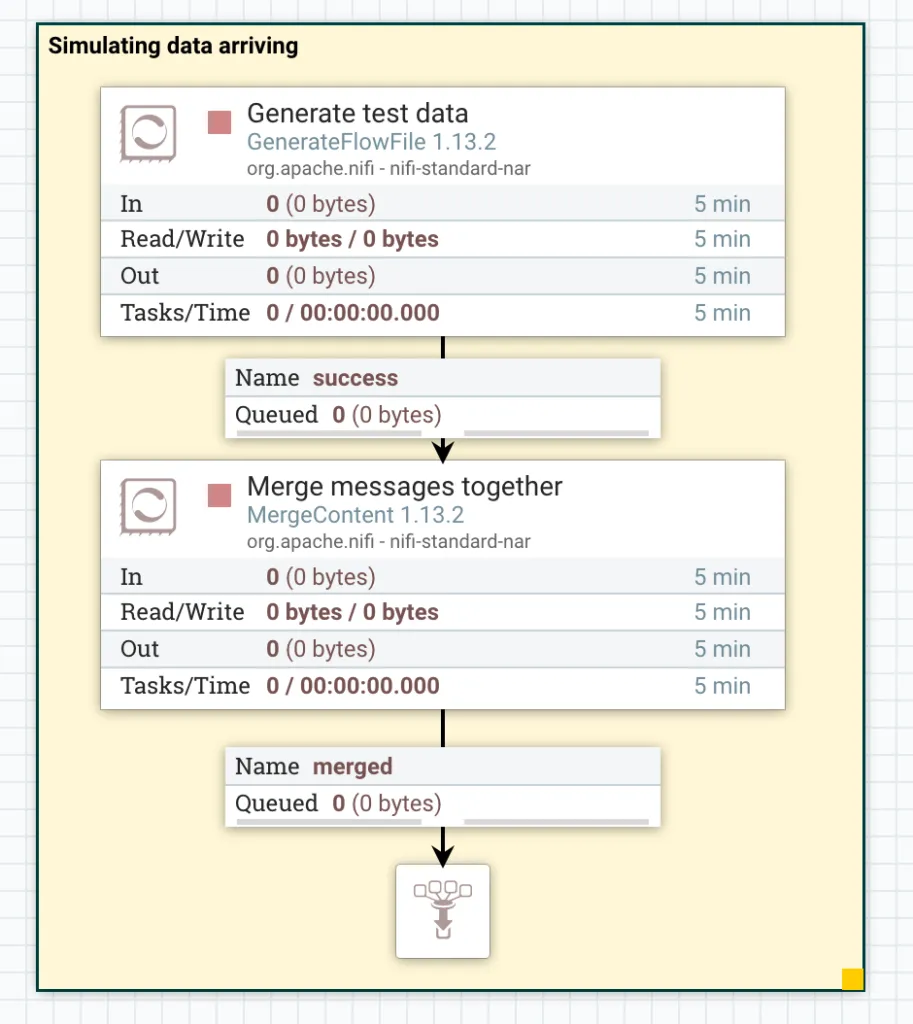
GenerateFlowFile and MergeContent connected
Start the flow and you’ll see that a handful of FlowFiles build up in the Success queue, before coming out as a single FlowFile in the Merged queue.
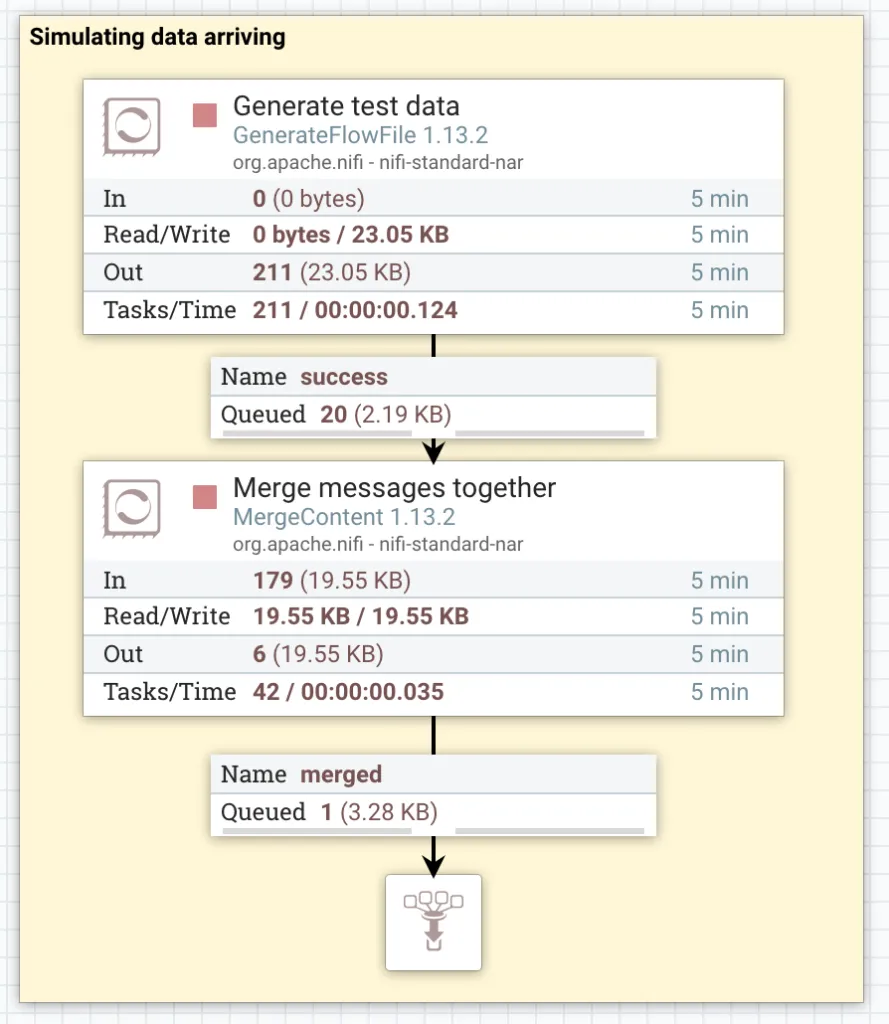
List the Merged queue and view the contents of one of the FlowFIles. You will see that we now have many similar messages in each FlowFile. (Right click the Merged queue and click List queue. Next to one of the items in the list, click the little Eyeball icon.)
Perfect, we are finished generating our test data.
The wrong way
Most of the time when I see this flow being built, it ends up looking like the screenshot below and it actually makes a lot of sense. If you aren’t too experienced with NiFi and you’re just doing what seems logical, then you end up with this, and it does work.
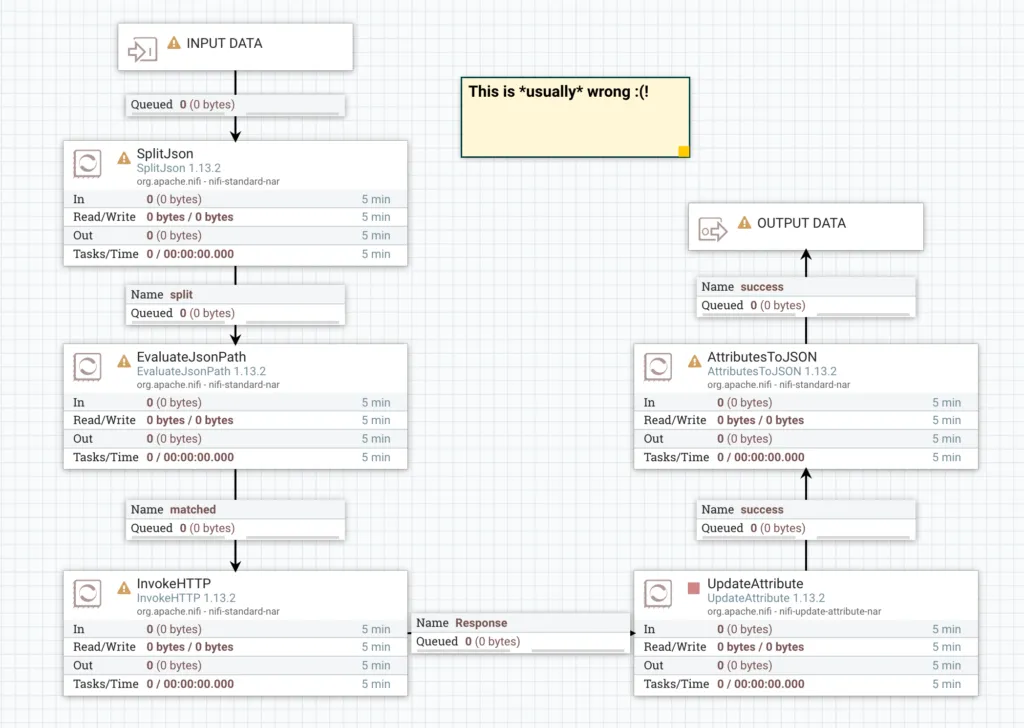
The wrong way to build this flow
That’s one of the strengths of NiFi - it’s very easy to build a flow that works. However, it’s less than optimal and misses out on many of the other strengths of NiFi. Lets improve it.
The right way
You might be surprised to see that we can actually redo that entire flow with a single processor. Now, it’s not quite that simple, as there’s some additional controller services that we need to configure and understand, but we end up with a much cleaner flow.
The magic processor is LookupRecord. This processor allows us to take an input Record and perform a Lookup. We’ve already discussed Records, but what is a Lookup? Well, essentially it’s performing a query and expecting a result. That sounds nice and generic, right? That’s the beauty of the LookupRecord processor.
There are so many different forms that a ‘Lookup’ might take. In our example here, its a REST API call - but what if you wanted to query an HBase table? Or an ElasticSearch index? Or a CSV file? Or execute a custom script? Well, LookupRecord encaspulates all of that and more! It’s a seriously powerful processor.
Let’s drag a LookupRecord into our canvas and take a look at its settings.
First of all, we need Record Reader and Writer services. These services describe how NiFi should read and write our messages. In this example, we are only using JSON for our messages. NiFi has native support for understanding JSON, so let’s add a new JsonTreeReader and JsonRecordSetWriter as our Reader and Writer. Click in to each field and from the drop down, select Create New Service.
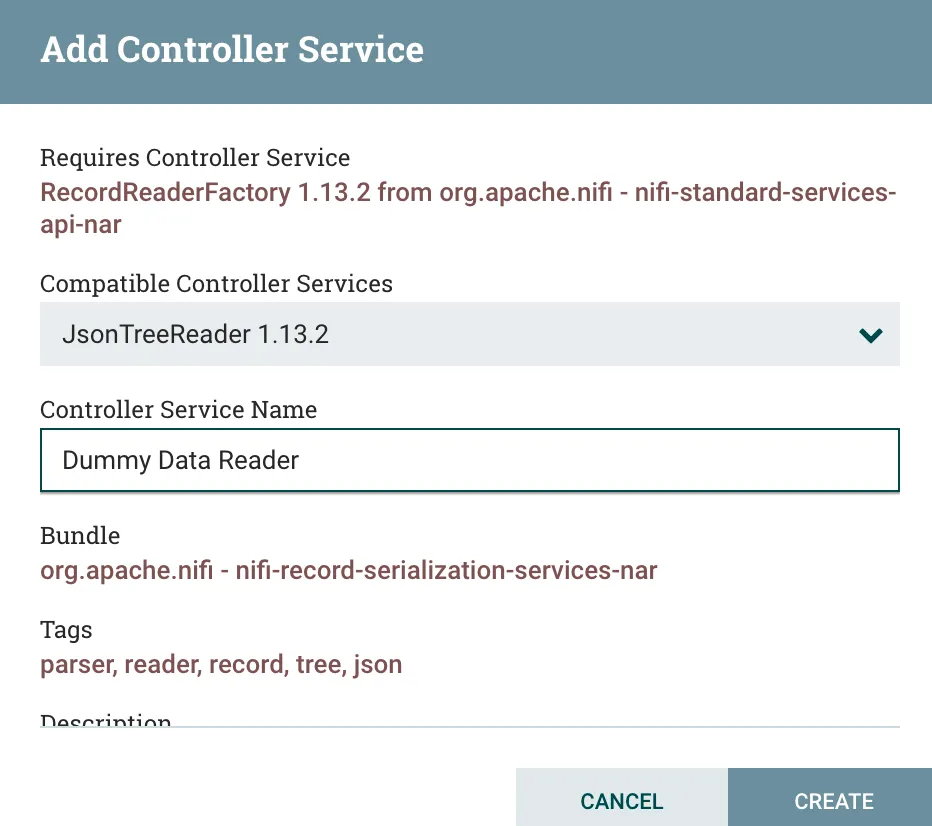
Adding a new JsonTreeReader service
For the Reader we are selecting JsonTreeReader and for the Writer we are selecting JsonRecordSetWriter. You should enter a descriptive name in the Controller Service Name box so that you remember what it’s used for.
Create both services now, and we should have something like this.
LookupRecord with Reader and Writer
We now need to configure & enable both the Reader and Writer. Click the right arrow next to one of them to get to the controller configuration window.

The Controller Service configuration window with disabled services
Next to each service, we can click the cog icon to review it’s configuration. For this example, we are going to leave the configurations as default. In the real world, you can set the Schema for your data here, which is a great way to ensure confirmity and consistency of your data throughout your pipelines.
To enable the services, click the lightning bolt icon and in the popup window click Enable**.** Close the popup window when the services have finished enabling, and you’ll see that the lightning bolt icon now has a line through it. If you need to change Controller Service configurations, you will need to disable them first by clicking the lighting bolt icon.

The Controller Service configuration window with enabled controllers
With both services enabled, close the Configuration window and return to the LookupRecord config window.
Now, add a Lookup Service just as we did for the Record Reader/Writers. You’ll see lots of options in the Compatible Controller Services drop down, but we are looking for Rest Lookup Service.
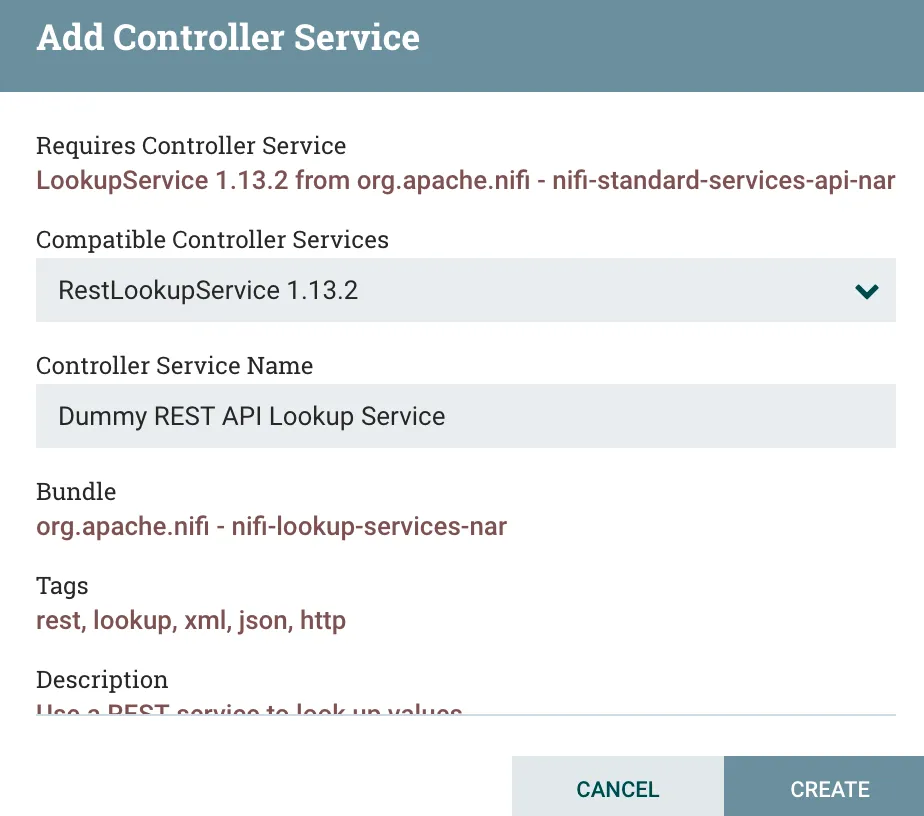
Adding a REST Lookup Service
Click Create and then click the right arrow icon to go back to the Controller Service configuration window. Click the Cog icon to configure the Rest Lookup Service controller.
Firstly, we need to add a Record Reader service just as we did before. This is the Reader that is used for understand the results of the API call. Create a new JsonTreeReader with default settings & enable it (again you might want to use a Schema in the real world, but we aren’t here).
Secondly, we need to enter the URL to our REST API. As I mentioned at the start, I have created a dummy REST API within NiFi itself, so I am pointing back to my own NiFi instance. This needs to be a valid URL - if you use HTTPS you will need to configure an SSLContextService. My API is on the path /api and I am passing a URL parameter called param1.
http://172.19.0.3/api?param1=${myQuery}I am setting the value of param1 using Expression Language to a variable called myQuery. Now, you’ll notice that we have never set a variable called myQuery yet, but we do have a field in our Record called query. It is actually the value of the Record field query that we want to use as the value of param1. We’ll get to that soon - keep reading!
We’re finished configuring the RestLookupService, so click Apply and then enable the service with the lighting bolt icon.
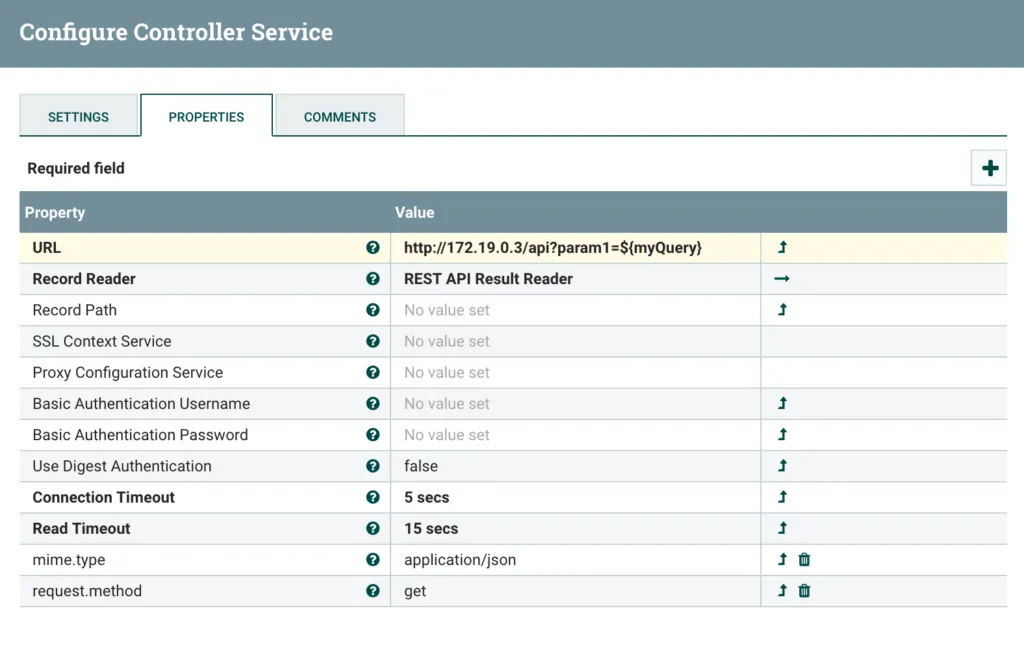
Configured RestLookupService
Return to the config window of the LookupRecord processor. There’s only 2 options left to change.
We need to do something with the result of the API call we made. For this example, I just want to stick the JSON result in to the Record as a new field. I’m going to call that new field enrich. So I need to put the full Record Path in to the Result RecordPath value. Read more about Record Paths here. I will use the value /enrich - this means a field called enrich at the root of the tree.
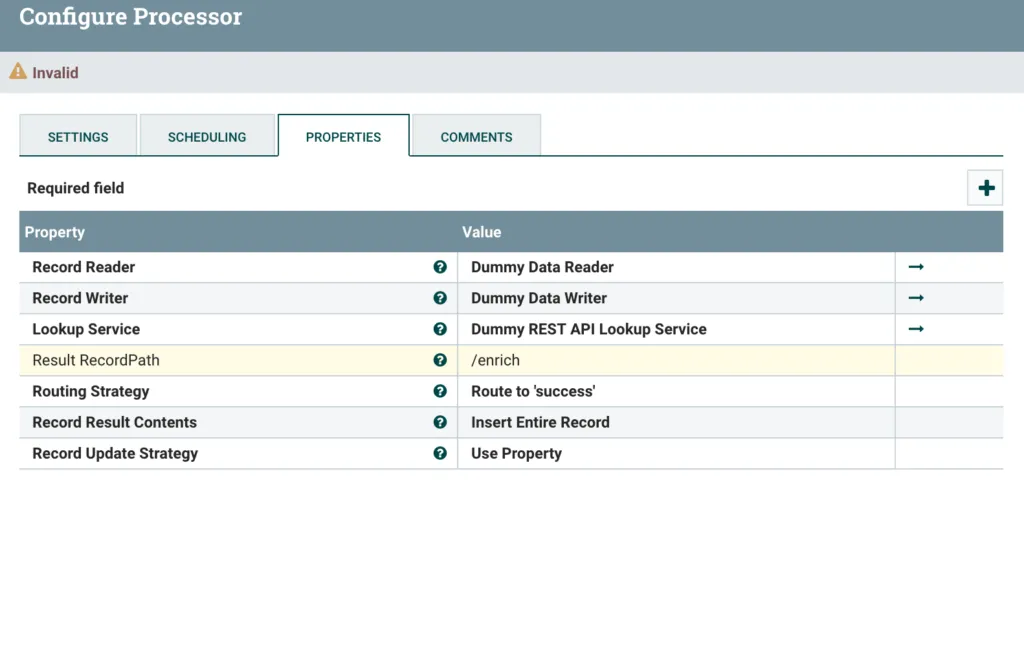
Setting the Result RecordPath
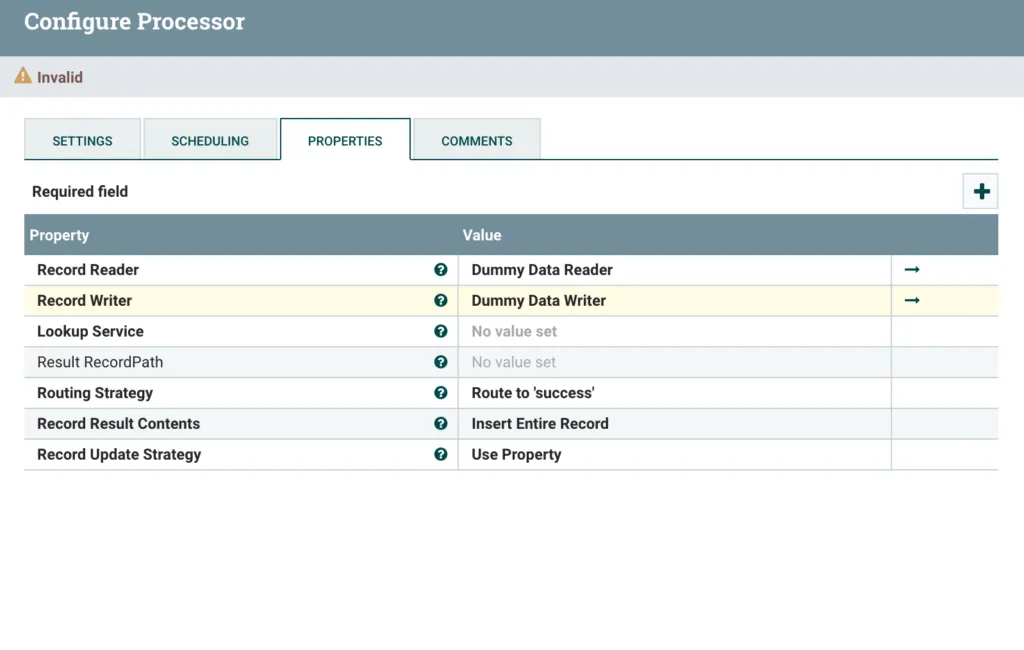
Lastly, we need to set that myQuery variable to the value of our query Record field. We do this by creating a new dynamic property in the LookupRecord where the property name is the name of the variable (so myQuery) and the value is the Record Path to the field in the Record (so /query). Add the new dynamic property by clicking the big + icon in the top right of the LookupRecord configuration window.
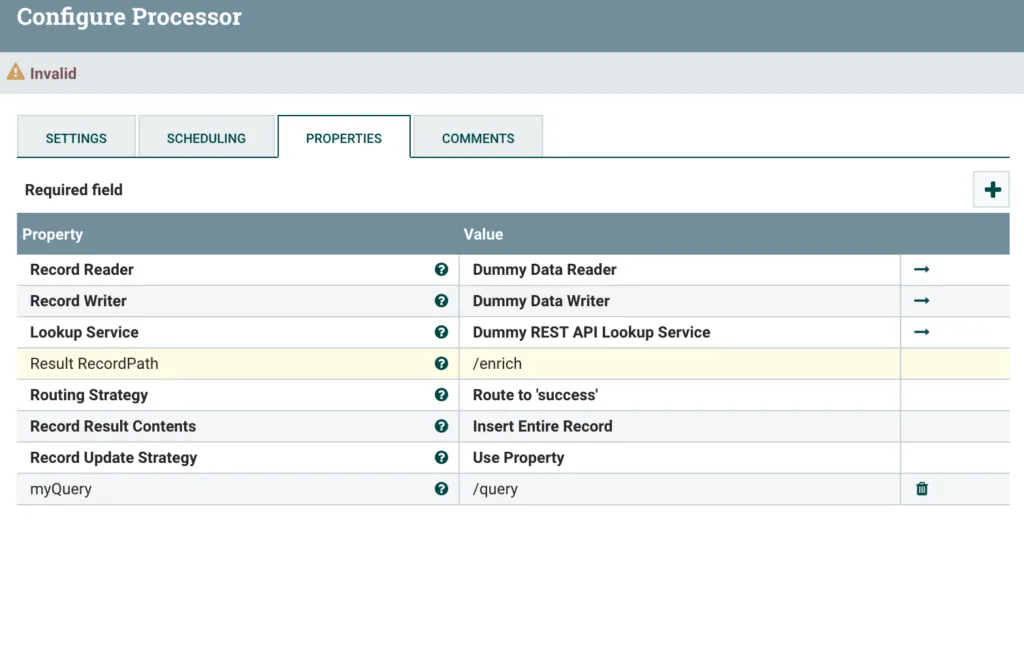
Finished LookupRecord config
Click Apply and we are finished with configuration.
I will delete the Funnel that my MergeContent was connected to, and instead connect the MergeContent directly in to the LookupRecord. I’ll add 2 new Funnels and connect the failure and success relationships from LookupRecord to one Funnel each.
Complete flow
The API that I created in NiFi in NiFi is very simple and I will discuss building it in a different post. At a high level, it is listening on /api and looking for the param1 URL parameter. It checks to see whether param1 value is either val1 or val2. It returns a JSON response telling you which value was sent. E.g. for val1 it will send:
{
  "result": "you sent val1"
}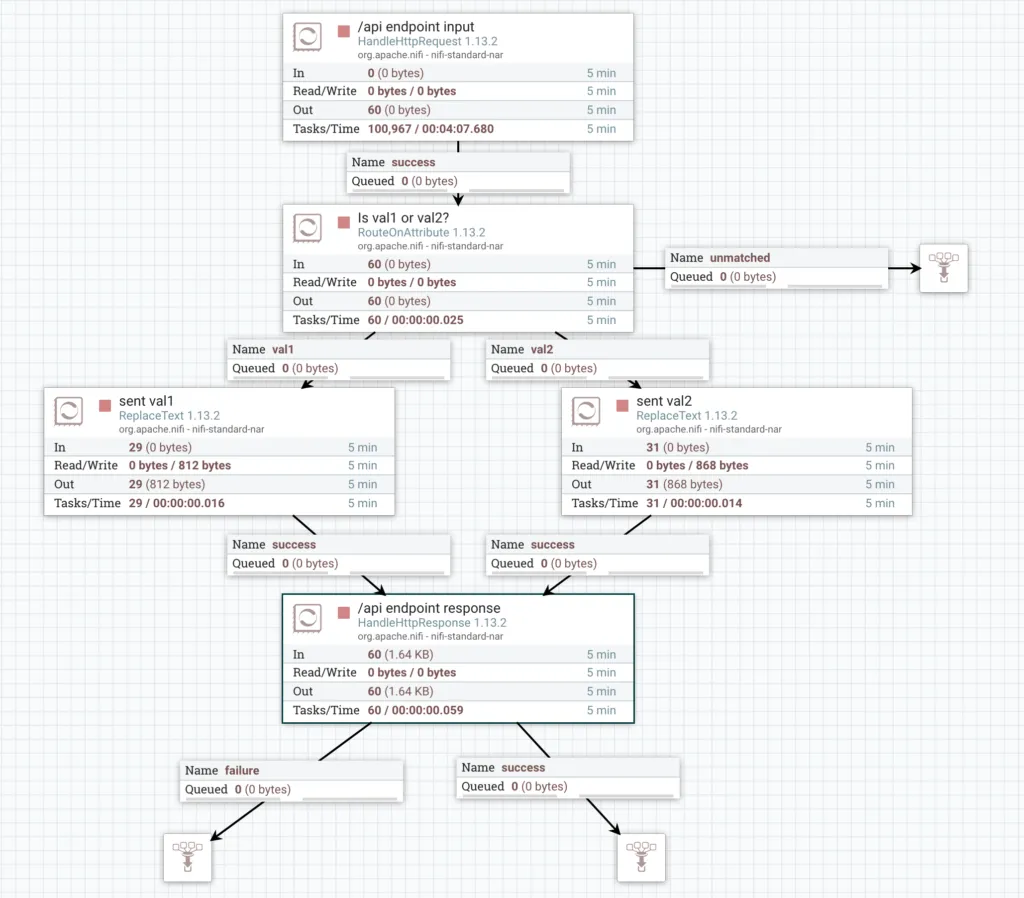
NiFi Dummy Rest API
So, all that is left is to turn our flow on and see what we get. Right clicking the canvas background and clicking Start will start all processors in the Process Group that we are in.
Messages are being generated and then merged in to FlowFiles that contain multiple messages. These FlowFiles are read by the LookupRecord which hits our REST API endpoint for every Record within the FlowFile. The result returned by the API is inserted into each record in the enrich field.
Running Flow
Let’s check the results by inspecting the FlowFile content on the success queue from the LookupRecord.
...,{
   "someInt" : "8421070184682044126",
   "someUUID" : "3db93282-16e2-4b0b-9c18-d8d822011872",
   "query" : "val2",
   "enrich" : {
     "result" : "you sent val2"
   }
 }, {
   "someInt" : "6962852573498787385",
   "someUUID" : "628b6989-44e4-43b3-b883-8d6fa34a7fa4",
   "query" : "val1",
   "enrich" : {
     "result" : "you sent val1"
   }
 },...
Inspecting the enriched data
As you can see, each of our Records now has an additiona field called enrich which contains the JSON result from the REST API.
Summary
To summarise, we have built a flow that is able to use Record data as part of an API call and insert the API response in to a field of the same Record. We have done this using only a single processor with a couple of supporting Controller Services, improving upon a flow that might have used 5 or more Processors to achieve the same goal.
You can download the Flow Definition for this flow here.
That’s it! Thanks for reading.