Getting started with NiFi's ScriptedReader
Records have become an integral part of working with NiFi since their introduction on May 8th, 2017 with the release of NiFi 1.2.0. They allow us to treat our data as more than just a bunch of bytes, giving NiFi the ability to better understand and manipulate common data formats used by other tools.
However, there’s always some tool out there that decides to do things a bit differently. JSON? AVRO? CSV? Nah. Here’s a data format we came up with after one really weird weekend in Vegas.
So, while NiFi has out of the box support for at least 8 of the most common formats, how do we handle the not so common ones?
Well, part of the 1.2.0 release note give us a hint:
“For those that like to write new capabilities on the fly using scripting languages you can build your own reporting tasks, record readers, and writers using various scripting langauges…”
This is alluding to the ScriptedReader, a pretty powerful feature that allows us to hook in to NiFi’s Record reading capabilities and define our own logic for making sense of our data.
This post is going to walk through creating our first ScriptedReader, just scratching the surface of the capabilities of this feature. I have seen several NiFi users ask the question “How should I process Key Value Pairs?” so taking the two-birds-one-stone approach, I’m going use that as the example here.
Without further ado, let’s jump in to it.
Test Flow
First, you need a working install of NiFi - if you don’t already have one, I wrote a post about getting one set up.
When you’re in NiFi, let’s set up a basic Flow that generates some sample data and tries to parse it as a series of Key Value Pairs (KVPs).
First, add a GenerateFlowFile processor. We’ll use this to generate our sample data. Configure the processor as follows:
- On the Scheduling tab, set the Run Schedule to 10 sec
- On the Properties tab, set the Custom Text to:
name:dennis age:45 job:veterinarian
name:dee age:45 job:actress
name:mac age:44 job:sheriff
name:charlie age:45 job:lawyer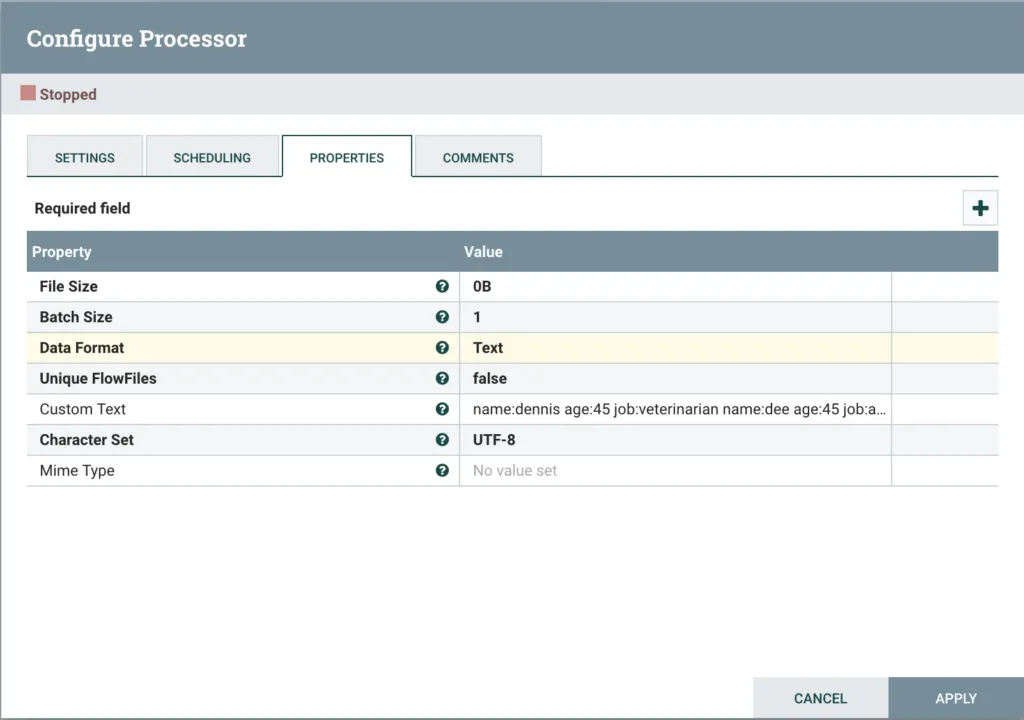
GenerateFlowFile Config
After this, add an UpdateRecord processor, then configure the Properties tab as follows:
-
For Record Reader:
- Select Create new service… from the drop down
- Select ScriptedReader as the Compatible Controller Service
- Enter KVP Scripted Reader as the Controller Service Name
-
For Record Writer:
-
Select Create new service… from the drop down
-
Select JSONRecordSetWriter as the Compatible Controller Service
-
Enter JSON Record Writer as the Controller Service Name
-
-
Set Replacement Value Strategy to Literal Value
-
Add a dynamic property with the name /location and a value philly
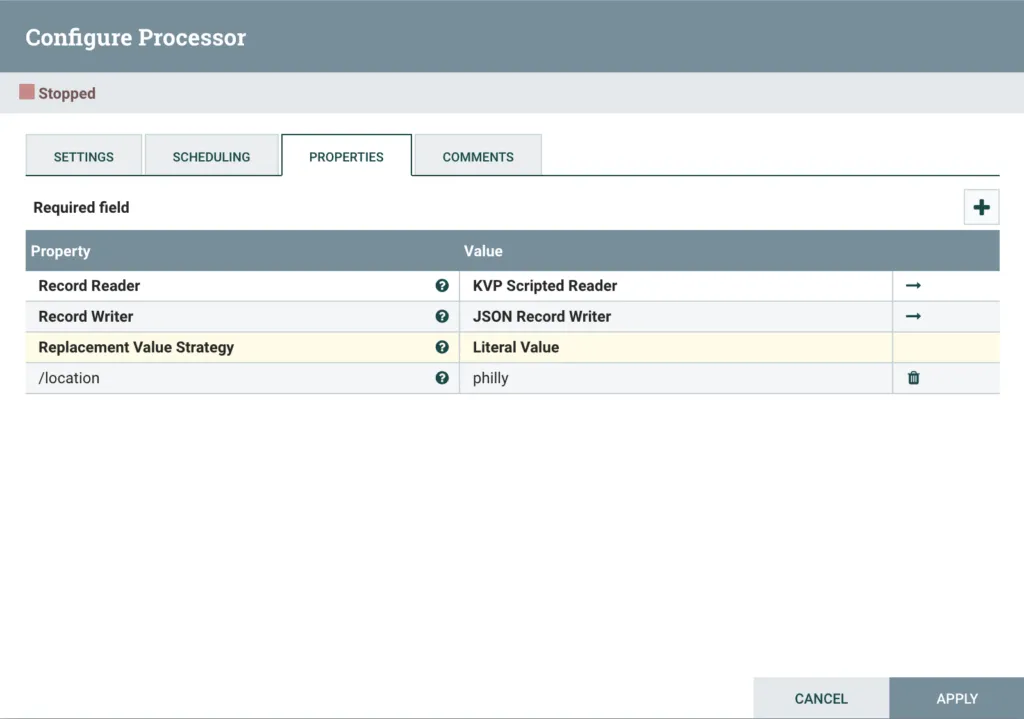
UpdateRecord Config
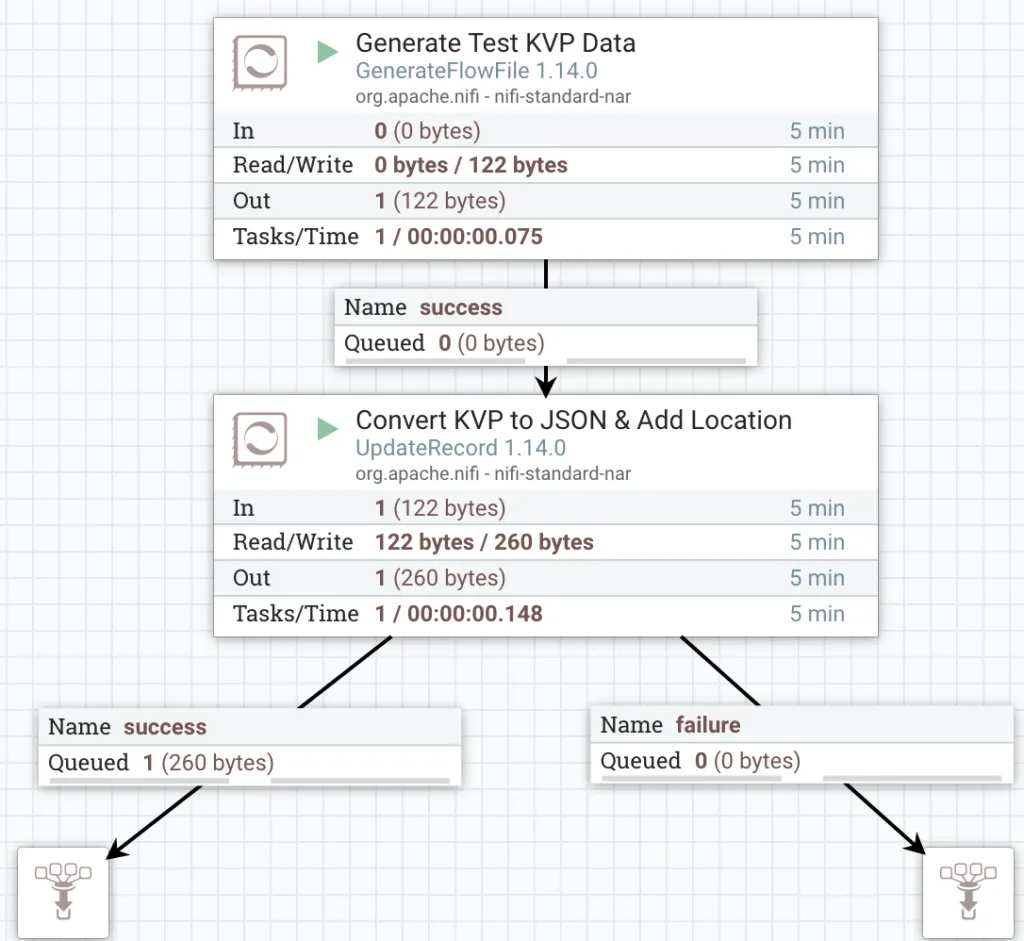
Next, drag on two Funnels. Now connect the GenerateFlowFile output to the UpdateRecord, then connect the UpdateRecord’s failure relationship to one Funnel and the success relationship to the other Funnel.
The Flow should look like this screenshot:
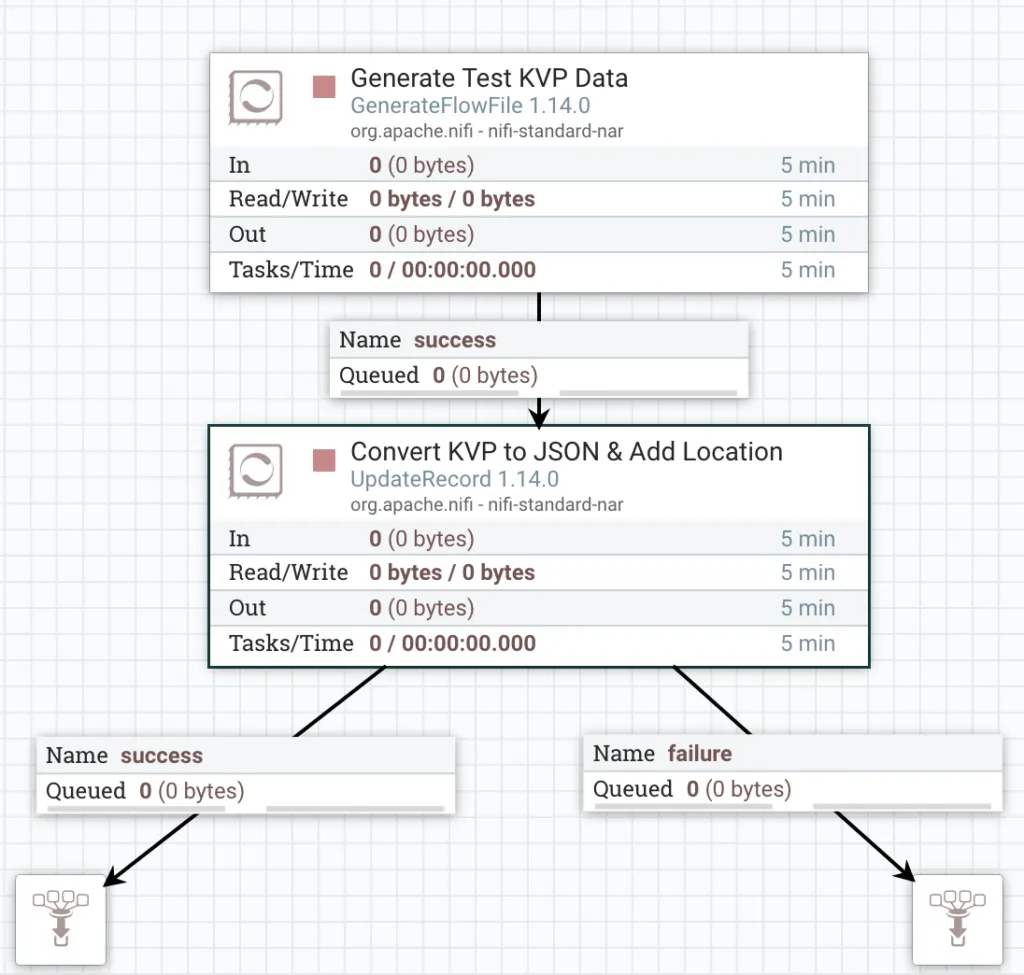
Complete Test Flow
That’s all we need to demonstrate our custom Reader. You can find a link to download this Flow from GitHub at the bottom of the post.
Development Environment
We are going to be using the Groovy language to create our ScriptedReader. A variety of languages are supported, but Groovy is the most robust.
Developing a script inside NiFi is cumbersome and error prone - it’s significantly easier to build our script outside of NiFi where we can take advantage of a proper editor with syntax highlighting, linting etc. and then copy our script back into NiFi.
My editor of choice is Visual Studio Code, and there is a plugin for Groovy called Groovy Lint, Format and Fix.
It is also possible to run Groovy code locally to test functionality, and for this we need a Groovy SDK. The easiest way to get set up is using SDKMAN to handle downloading, installing and activating SDKs for us. Follow the install instructions for SDKMAN.
With SDKMAN installed, we can use it to install Groovy. NiFi 1.14.0 uses Groovy 2.5.4, so let’s install that version.
sdk install groovy 2.5.4With that installed, you can now use the groovy command to execute Groovy scripts. Verify that you can run groovy:
groovy -vTo execute a Groovy script you would use something like the following:
groovy /path/to/script.groovyBuilding the script locally
Find the full code sample here.
Our local system has no knowledge of the NiFi internals, but we can build the main logic of our Reader outside of NiFi to allow us to more quickly test & iterate.
Fundamentally, our script needs to be able to:
- Read a line of text
- Split the line up in to Key Value Pairs
- Split each Key Value Pair into a Key and a Value
- Return an object containing the Keys and Values
- Move on to the next line, repeat
Let’s start by creating the logic for these basic steps first. Please keep in mind that this is only a basic implementation of parsing KVPs for demonstration purposes, so there’s a lot it won’t do.
To start the script, we need our test data as shown at the start of this post. We’ll use a multiline String to contain the test data.
test_data = '''name:dennis age:45 job:veterinarian
name:dee age:45 job:actress
name:mac age:44 job:sheriff
name:charlie age:45 job:lawyer'''
Next, we need a way to read our string line by line, and do something with each line. So let’s add a little loop that splits by a newline, calls a function on each line, and pushes the results to an array. We’ll also print the array so we can see the result. Notice that we are calling a method called parse() that we have not implemented yet.
records = []
test_data.split('\\n').each { line ->
    records.add(parse(line))
}
print(records)
Let’s create the parse() method. This method will contain the functionality we want to bring into NiFi. So, it needs to accept an input line and return us the set of Key Value Pairs. We’ll also do a basic check for the line being null. Our return type is Map<String, Object> because we have a Key, which will always be a String, and a Value which could be any kind of data. This is also the format NiFi will expect for Records when we port this to NiFi.
Map<String, Object> parse(String line) {
    if (line == null) {
        return null
    }
    ...rest of the code here...
}
Now we need to add the basic parsing logic to our parse() method. Each call of the method is getting an individual line of the sample data, e.g.
name:dennis age:45 job:veterinarianSo, we need to split this line up in to the individual KVPs, which in our basic example is just separated by a single space (meaning this example won’t handle Values with spaces!)
List<String> kvps = line.tokenize(' ')The Groovy tokenize() method splits the line by a delimiter (we set it to a single space) and returns an iterable List of the splits, e.g. for the first line in the data, we have 3 splits (our KVPs):
[name:dennis, age:45, job:veterinarian]Now that we have the set of KVPs, we need to split each Key from the Value (separated by the colon) and collect the results into our Map, to represent our Record.
Map<String, Object> recordValues = [:]
kvps.each { row ->
        String key = ''
        String value = ''
        (key,value) = row.tokenize(':')
        recordValues.put(key, value)
}
return recordValues
This is the basic logic of our KVP Reader. We can execute the code locally to test with:
groovy ./nifi-snippets/flows/scripted-reader-key-value-pair/local-kvp-testing.groovyWhich gives us the following output:
[
[name:dennis, age:45, job:veterinarian], [name:dee, age:45, job:actress],
[name:mac, age:44, job:sheriff],
[name:charlie, age:45, job:lawyer]
]
Not the most interesting on its own, but in NiFi, each Map in this List is going to be a Record. So let’s start getting our code ready for NiFi.
Building the script for NiFi
Find the full code sample here.
When creating a ScriptedReader, NiFi is expecting it to have two things: a RecordReaderFactory and the associated RecordReader.
Let’s start with the RecordReaderFactory which, in our case, is just going to implement the required method createRecordReader() and return an instance of our RecordReader.
You’ll see that the createRecordReader() takes a bunch of parameters, but in this example we’re only concerned with the **InputStream inputStream** which contains the actual stream of data that forms the content of the FlowFile, which we pass to our RecordReader.
class KVPReaderFactory extends AbstractControllerService implements RecordReaderFactory {

    public KVPReaderFactory() {
    }

    public RecordReader createRecordReader(final Map<String, String> variables, final InputStream inputStream, final long inputLength, final ComponentLog componentLog) throws IOException {
        return new KVPReader(inputStream)
    }

}
Next, we need to add our RecordReader which we’ll call KVPReader. For the RecordReader, we must implement the constructor, and 3 methods: getSchema(), close() and nextRecord().
Our constructor is simply going to pass the inputStream from the RecordReaderFactory to a BufferedReader, which will handle consuming the byte stream of FlowFile content, giving us consumable lines of text.
In this example we aren’t going to cover Schemas in detail, but the getSchema() method must be implemented and return a schema. When parsing KVPs, we will generate a basic Schema where every value is represented by a String.
Next, we must also implement the close() method which properly closes out the BufferedReader that is handling our input stream.
Finally, the nextRecord() method is called every time the Reader has finished reading & returned one Record, and must process the next one. It is this method that will implement the logic that we created previously in our local script.
class KVPReader implements RecordReader {

    private final BufferedReader bufferedReader

    public KVPReader(InputStream input) {
        bufferedReader = new BufferedReader(new InputStreamReader(input))
    }

    public Record nextRecord(final boolean coerceTypes, final boolean dropUnknownFields) throws IOException, MalformedRecordException {
        ....
    }

    @Override
    public void close() throws IOException {
        bufferedReader.close()
    }

    @Override
    public RecordSchema getSchema() {
        return schema
    }

}
Looking specifically at nextRecord() we need to bring in the logic we created earlier, and add a few bits to make it work in NiFi.
The first thing to notice is that, instead of just returning Map<String, Object> the method is actually returning a Record. This Record object is made up of our Map<String, Object>, which contains the data, in addition to a RecordSchema that defines field names and data types.
Next, we aren’t just setting up a String with our test data in, we need to actually consume the FlowFile content from our BufferedReader.
final String line = bufferedReader.readLine()This gives us a single line of KVPs, just as we had before in our parse() method. The rest of the nextRecord() method is very similar to our local script, with a few changes. We need a new variable to contain a List of RecordField objects - this list will be used to create the RecordSchema.
List<RecordField> recordFields = []Inside our **each** loop, we need to now populate the recordField list, so we create a RecordField for each KVP and add it to the list. A RecordField needs a field name and a RecordFieldType to represent the data type. For the name, we will reuse the Key of the KVP. For the data type, we are simply going to use Strings for this example.
recordFields.add(new RecordField(key, RecordFieldType.STRING.getDataType()))Next, we need to create an instance of a RecordSchema, so we’ll keep it basic with the SimpleRecordSchema and pass it our list of field types.
SimpleRecordSchema schema = new SimpleRecordSchema(recordFields)Finally, we need to create & return our Record. You can write your own class to implement the Record interface, but we’ll just use the ready made MapRecord. A MapRecord takes in a RecordSchema and a Map<String, Object> of the values.
return new MapRecord(schema, recordValues)The rest of the code in the method is identical to our original local version. See the GitHub repo for the complete code.
Run it in NiFi
With our code complete, we now need to test it in NiFi.
Return to the NiFi flow and enter the configuration for the ScriptedReader called KVP Record Reader. Copy the complete script and paste it into the Scipt Body property. Ensure that Script Engine is set to Groovy.
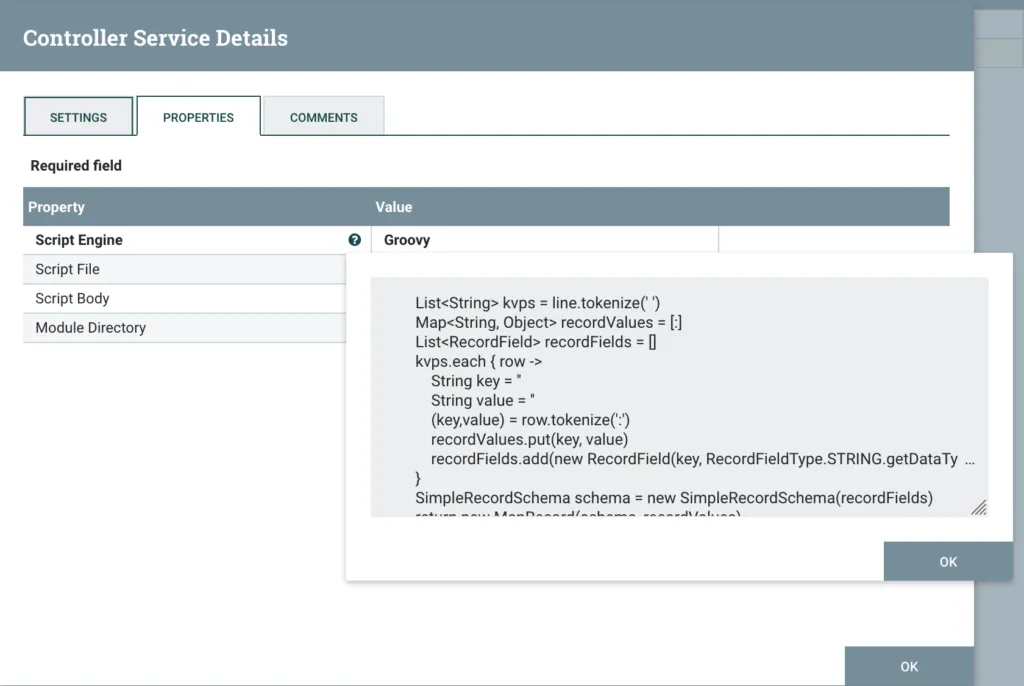
ScriptedReader Config
Save this config, and enable both the ScriptedReader and JsonRecordSetWriter by clicking the Enable button.

Enable the Record Reader & Writer
You should now be able to start both the GenerateFlowFile and UpdateRecord Processors. A FlowFile should end up in the Success queue, containing a JSON representation of our test data plus the additional location field.
Open the Success queue and view the content of the FlowFile.
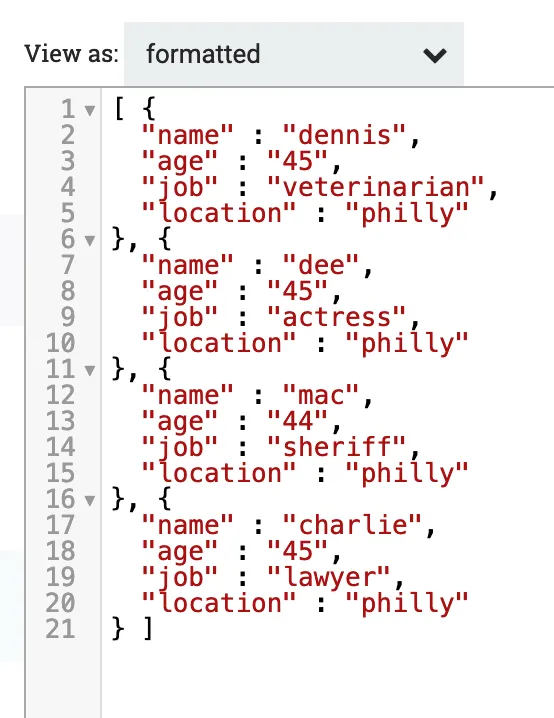
JSON Data
That’s it!
Find the complete scripts & the flow definition on the GitHub repo for this post.