Webhooks & Analytics with Cloudflare Workers & Tinybird
Cloudflare recently accounced their Workers Launchpad - a $1.25bn fund for startups that build using Cloudflare’s severless compute framework called Workers.
There’s been a lot of hype about this announcement and serverless compute is something I’ve always found fascinating. At Cloudera, one of the most exciting projects was code-named ‘NiFi As A Function’ (eventually released as DataFlow Function) which used the NiFi stateless runtime to run NiFi flows as functions inside any cloud-vendors serverless compute, e.g. AWS Lambda, Azure Functions, Google Cloud Functions.
At Tinybird, we make ClickHouse available as a serverless backend for running fast analytical workloads. We’ve built various projects with other serverless technologies, like this recent example with Upstash and Vercel Edge.
Cloudflare are a pretty cool vendor, and they also happen to be a very large adopter of ClickHouse. I had never used Cloudflare’s Workers before, so I decided to give it a go over the weekend.
But what to build?
A while ago, I started a new blog called about data. I have worked as a consultant in the data world for some time now, and as much as I personally love hardcore developer tools, the reality is that most organisations need something more accessible. Most data teams aren’t chock-full of developers; data teams tend to be a mix of converted-DBAs, analysts, and one or two over-subscribed general developers.
This is had lead to the rise of no-code / low-code tools that make working with data easier, as well as the increasing adoption of serverless. Serverless reduces the operational overhead associated with managing your own platforms, freeing up resources to invest in stronger data teams and deliver greater business value.
This idea of making data more accessible is what I like to call the ‘Data Experience’ and it’s something that I think more vendor’s need to take seriously, hence why I started a blog to talk about it.
Anyway, as part of that blog, I also ran a discord community for readers to get involved and discuss. I wanted to have a channel in my Discord be notified when I publish a new post. Now, I use Ghost as my blog platform, which is open-source, and has a hosted solution provided by a non-profit organisation. Ghost can integrate with Discord by re-using the Slack integration, you just use your Discord webhook URL suffixed with /slack (see docs).
This works brilliantly, however I also wanted to do something else; every time a post is published, I also want to send an event to Tinybird. I use Tinybird to implement privacy-respecting web analytics on my blogs (including this one), instead of using Google Analytics. This is great for tracking the normal numbers, but something I’ve been wanting to do is create a timeline events, so that I can compare how those numbers change in response to things that I do. For example, if I publish a post, do the numbers change? What about if I tweet? I want to know what impact my actions are having on the success of my blog.
A custom webhook
To do this, I needed a custom webhook; when I publish a new post on my blog, instead of calling the Discord webhook, I call my own webhook, which will both send the event to Tinybird, and then call the Discord webhook. I don’t want to manage a server running this, and I also don’t want to pay much (or anything) for it. For this, Cloudflare’s Workers are a perfect fit, with absolutely 0 management overhead, and a generous free tier that is more than I need.
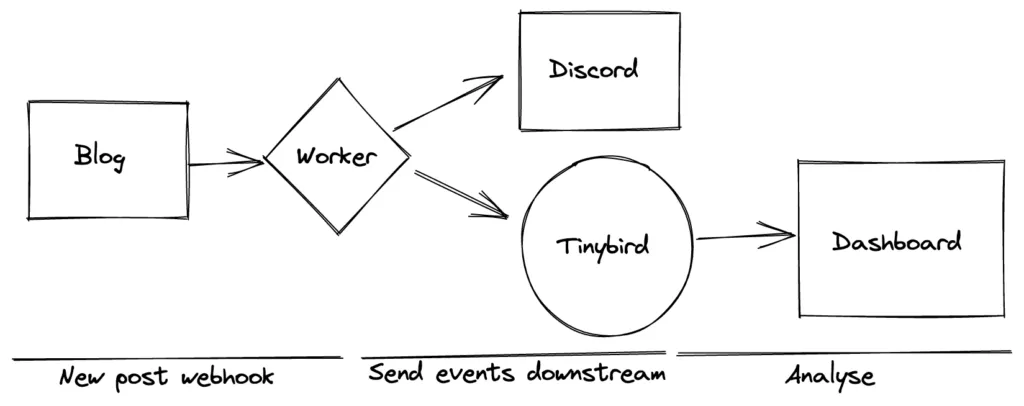
The nice thing about this is that I can use the same pattern for any service that supports webhooks, for example, Twitter allows you to send account activity to a webhook, so I can start to timeline these events as well.
Getting started
First, get yourself a Cloudflare account. Head over to the sign up page.
You can set up a custom subdomain for your Workers inside the Cloudflare dashboard if you want to, it’s optional.
Then get the Cloudflare Worker CLI, Wrangler, installed.
npm install wrangler --save-devAuthenticate Wrangler with your Cloudflare account.
wrangler loginMove to the directory you’ll be working in and init a new Worker project using Wrangler.
wrangler init custom-webhookFollow the guided setup, entering your own details. I’m using TypeScript for this project.
With the setup finished, you can start to build your Worker. For a TypeScript project, the fun stuff is all in the index.ts file. This will be pre-populated with a fetch method, which will be the entry point to your code. You can write your functions etc. outside of this method, but the logic to invoke them should be contained in fetch.
The fetch method is passed the request, env and ctx variables as parameters. For this example, request and env are useful to us. request will give you access to the details about the incoming request that invoked your Worker. env will give you access to details about your Worker environment, such as environment variables and secrets.
A basic Discord webhook
Let’s start with the basic Discord webhook. All we want to do is respond to an incoming ‘New Post’ event and send the blog post URL as a message in a Discord channel.
We don’t need the discord.js wrapper library for this stuff, we’ll just use a standard JavaScript fetch call.
To start, add a webhook to a channel in your Discord server. Click the little Cog icon (Edit Channel) next to the channel name, then go to the Integrations tab. Click through to Webhooks, and then add a new webhook. Give it a name, and then click the Copy Webhook URL button.
Your URL will look something like this one.
https://discord.com/api/webhooks/1015225946804123456/aaPaaalENTH7aaaIQSSaZJaaHJPaaKlHSaWWaa5aK1aaFRaUDaEaaUaV_-XYYEaT8a6aThe two final chunks of the URL path are custom to your channel & webhook. The last chunk is your API token, and the bit before that is the channel ID.
https://discord.com/api/webhooks/{channel_id}/{api_token}You want to make sure that you keep the API token private, as this is what authenticates webhooks executions.
So that we don’t leak the API token into version control with the code, we’ll put that token into a secure environment variable. You can do this in the Cloudflare UI if you wish, but I’ll use the CLI.
wrangler secret put DISCORD_WEBHOOK_POSTS_CHANNEL_KEYDISCORD_WEBHOOK_POSTS_CHANNEL_KEY will be the name of my environment variable that I can reference in my code.
You will get a prompt to enter the value of the variables, you should paste in your API key. From my example above, that would be:
aaPaaalENTH7aaaIQSSaZJaaHJPaaKlHSaWWaa5aK1aaFRaUDaEaaUaV_-XYYEaT8a6aWith our secret set up, we can start writing the Worker code.
Open up index.ts in your favourite code edtior. The section we need to edit is the contents of the fetch method.
export default {
  async fetch(
    request: Request,
    env: Env,
    ctx: ExecutionContext
  ): Promise<Response> {},
};
Start by adding a variable for your Discord Webhook URL. Include the channel ID in the URL path, but remove the API token. Wrap the string in in backticks (`), and then use ${DISCORD_WEBHOOK_POSTS_CHANNEL_KEY} to insert the value of our API token from the environment variables.
Note that we must prefix our environment variable name with env as they are not global. This is a special case for Module Workers.
export default {
  async fetch(
    request: Request,
    env: Env,
    ctx: ExecutionContext
  ): Promise<Response> {
    const discord_webhook_url = `https://discord.com/api/webhooks/...680412.../${env.DISCORD_WEBHOOK_POSTS_CHANNEL_KEY}`;
  },
};
Next, we want to get the body of the incoming request. We can use the request variables that is passed to the fetch method, together with await to resolve the promise, and then json() to get the data we want.
export default {
  async fetch(
    request: Request,
    env: Env,
    ctx: ExecutionContext
  ): Promise<Response> {
    const discord_webhook_url = `https://discord.com/api/webhooks/...680412.../${env.DISCORD_WEBHOOK_POSTS_CHANNEL_KEY}`;

    const body = await request.json();
  },
};
We can then access the fields of the body. Ghost will send the fields following the Slack Webhook spec, you can read more about that here.
Keeping it very basic, let’s build an object that simply has a custom username and has the post URL as the message content. You can add as much detail as you like. The post URL comes through at the following path body.attachments[0].title_link.
export default {
  async fetch(
    request: Request,
    env: Env,
    ctx: ExecutionContext
  ): Promise<Response> {
    const discord_webhook_url = `https://discord.com/api/webhooks/...680412.../${env.DISCORD_WEBHOOK_POSTS_CHANNEL_KEY}`;

    const body = await request.json();
    const message = {
      username: "<user>",
      content: body.attachments[0].title_link,
    };
  },
};
That’s the payload for our message to Discord complete. Now we just need to POST that towards our URL. Note that you will need to set the Content-Type and CORS headers as below, otherwise your request will be rejected.
export default {
  async fetch(
    request: Request,
    env: Env,
    ctx: ExecutionContext
  ): Promise<Response> {
    const discord_webhook_url = `https://discord.com/api/webhooks/1015225946804123456/${env.DISCORD_WEBHOOK_POSTS_CHANNEL_KEY}`;

    const body = await request.json();
    const message = {
      username: "<user>",
      content: body.attachments[0].title_link,
    };

    fetch(discord_webhook_url, {
      method: "POST",
      body: JSON.stringify(message),
      headers: {
        "Content-Type": "application/json",
        "Access-Control-Allow-Origin": "*",
      },
    });
  },
};
At this point, it’s basically complete. This will happily start posting the URLs into Discord. You can get fancy checking the Discord response if you want.
Lastly, we can return a basic 200 response to Ghost (the original invocation of the webhook).
export default {
  async fetch(
    request: Request,
    env: Env,
    ctx: ExecutionContext
  ): Promise<Response> {
    const discord_webhook_url = `https://discord.com/api/webhooks/1015225946804123456/${env.DISCORD_WEBHOOK_POSTS_CHANNEL_KEY}`;

    const body = await request.json();
    const message = {
      username: "<user>",
      content: body.attachments[0].title_link,
    };

    fetch(discord_webhook_url, {
      method: "POST",
      body: JSON.stringify(message),
      headers: {
        "Content-Type": "application/json",
        "Access-Control-Allow-Origin": "*",
      },
    });

    return new Response(null, { status: 200 });
  },
};
That’s the final code for the Discord part of the Webhook. Not much to it.
Publish & test
To test this part of the Worker, let’s publish it to Cloudflare and add the webhook to Ghost.
wrangler publishOnce published, it’s useful to tail the logs to see if you’re getting any errors when something calls the worker. You can do this in the UI or from the CLI.
wrangler tailTo invoke this webhook from Ghost, we’ll use the basic Slack integration, which comes with the Starter plan.
When the worker has deployed, get the URL. It will be shown in the terminal after the publish command, or you can copy it from the dashboard in the UI.
In Ghost, go to your Admin dashboard and click the Cog icon. Then go to Integrations, find Slack and click Configure. Paste the URL to your Worker in the Webhook URL field.
There is a Send test notification button which sends a dummy message, however this won’t work with our basic example, as it doesn’t contain the field we’re looking for. Feel free to improve that! So, click Save, and you can try publishing a post. The message will simply be the post URL, but Discord automatically fetches rich information about the URL, including the post excerpt and splash image.
Adding Tinybird
You can sign up for a free Tinybird account and use it with no time limit. For my needs, the free tier is fine.
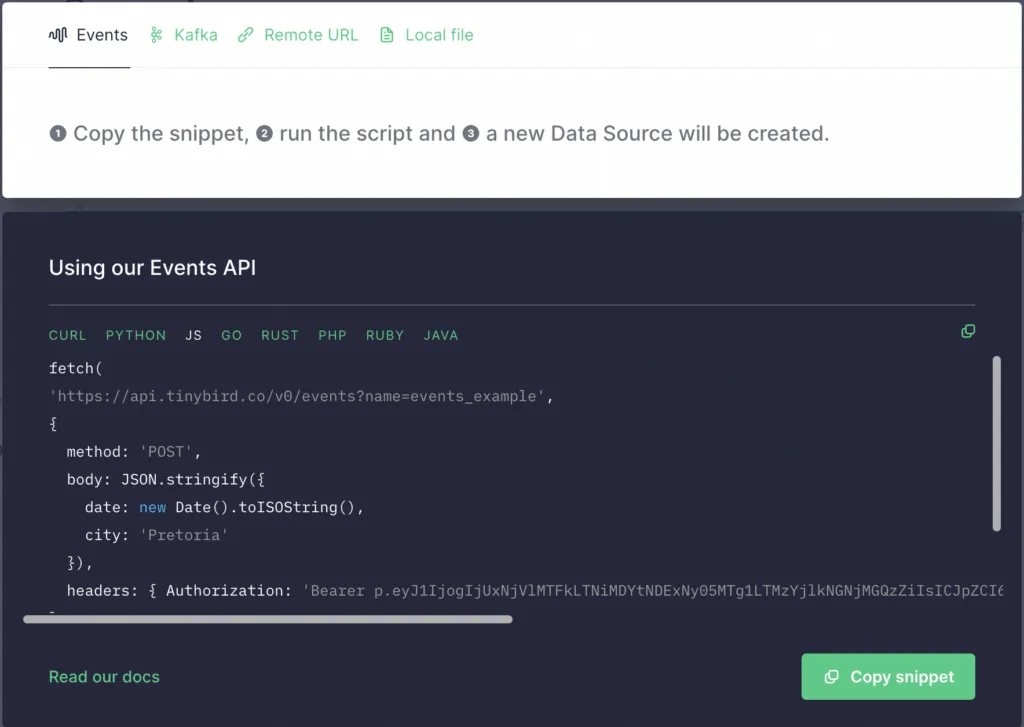
When you sign in, create a new Workspace for your events. You can pick either the EU or US region. Click the + icon next to the Data Sources on the left hand side, and make sure you’re looking at the Events tab. Select the JS snippet from the examples at the bottom, and copy the whole snippet.
We need to do two things. Firstly, just as we did with the Discord API key before, we’re going to create a new secret for the Tinybird Auth Token.
wrangler secret put TINYBIRD_EVENTS_KEYBack in our code editor, we’re going to add this snippet just before we return the Response in our fetch method.
The URL for the fetch request will look something like https://api.tinybird.co/v0/events?name=events_example. Notice the name=events_example? This will become the name of your data source, so feel free to change the name to anything you want, I’ve called mine just events.
We’ll also modify the Authorization header to use the secret environment variable instead of including the token in the code.
export default {
  async fetch(
    request: Request,
    env: Env,
    ctx: ExecutionContext
  ): Promise<Response> {
    const discord_webhook_url = `https://discord.com/api/webhooks/1015225946804123456/${env.DISCORD_WEBHOOK_POSTS_CHANNEL_KEY}`;

    const body = await request.json();
    const message = {
      username: "<user>",
      content: body.attachments[0].title_link,
    };

    fetch(discord_webhook_url, {
      method: "POST",
      body: JSON.stringify(message),
      headers: {
        "Content-Type": "application/json",
        "Access-Control-Allow-Origin": "*",
      },
    });

    fetch("https://api.tinybird.co/v0/events?name=events", {
      method: "POST",
      body: JSON.stringify({
        date: new Date().toISOString(),
        site: "<site>",
        type: "blog_post",
        owner: "self",
        link: body.attachments[0].title_link,
      }),
      headers: { Authorization: `Bearer ${env.TINYBIRD_EVENTS_KEY}` },
    });

    return new Response(null, { status: 200 });
  },
};
In this snippet, we are simply creating an object with some fields, and then turning it into a JSON string. We POST this JSON string to the Tinybird Events API, which is ingested into a table.
We can then use Tinybird to perform analytics on this data, and expose the results as REST APIs. I don’t have to create any infrastructure or set up tables, that’s all taken care of for me.
I will use these events to create a timeline of activities, like publishing blog posts or send tweets, and overlay that onto my tracking data. This gives me some insights into how much impact my activities are having.
That’s it!