Using CloudFlare Workers for Twitter webhooks
Since the goblin ruined Twitter, this post is now out of date. None of this will work anymore and won’t be updated.
I recently wrote about building my first CloudFlare Worker. Something I have wanted to do for a while is to analyse my Twitter activity, so I can begin to measure what impact my activity has.
Twitter has the Account Activity API which allows you to register a webhook, sending various Twitter actions to an external service. I wanted to send my Twitter activity to Tinybird, as I also capture all of my web analytics data there too. To start with, I want to see what kind of Twitter activity (if any) has an impact on my website traffic.
To register your webhook with Twitter, the webhook endpoint will need to respond to some Challenge-Response Checks (CRC) that Twitter sends to verify that you control the endpoint. Here’s how to do that with CloudFlare Workers.
If you’ve already got the API access sorted out, skip to the code (or find the complete code on GitHub).
Getting API Access
I’m going to do my best to guide you through the process of getting setup with Twitter’s APIs, but I found the experience to be pretty terrible & I may have repressed a few steps from memory. The Twitter documentation is out of date, there are dead links everywhere, and you have to bounce around between a million different pages.
To start, you need to create a developer account with Twitter’s Developer Platform.
We’ll pretty much follow the steps outlined here.
Go to your Developer Portal and add a new App.
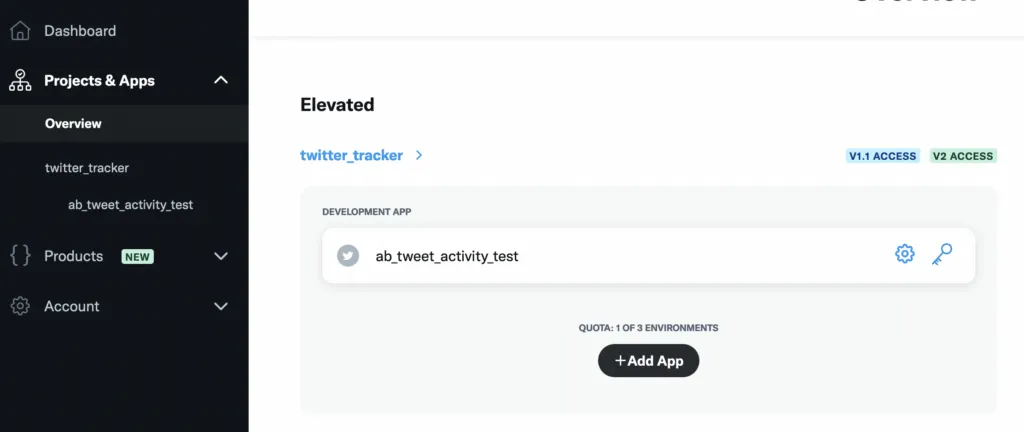
With your App created, go to the App’s setting (you should be taken there after creating the App, or click the little Cog icon).
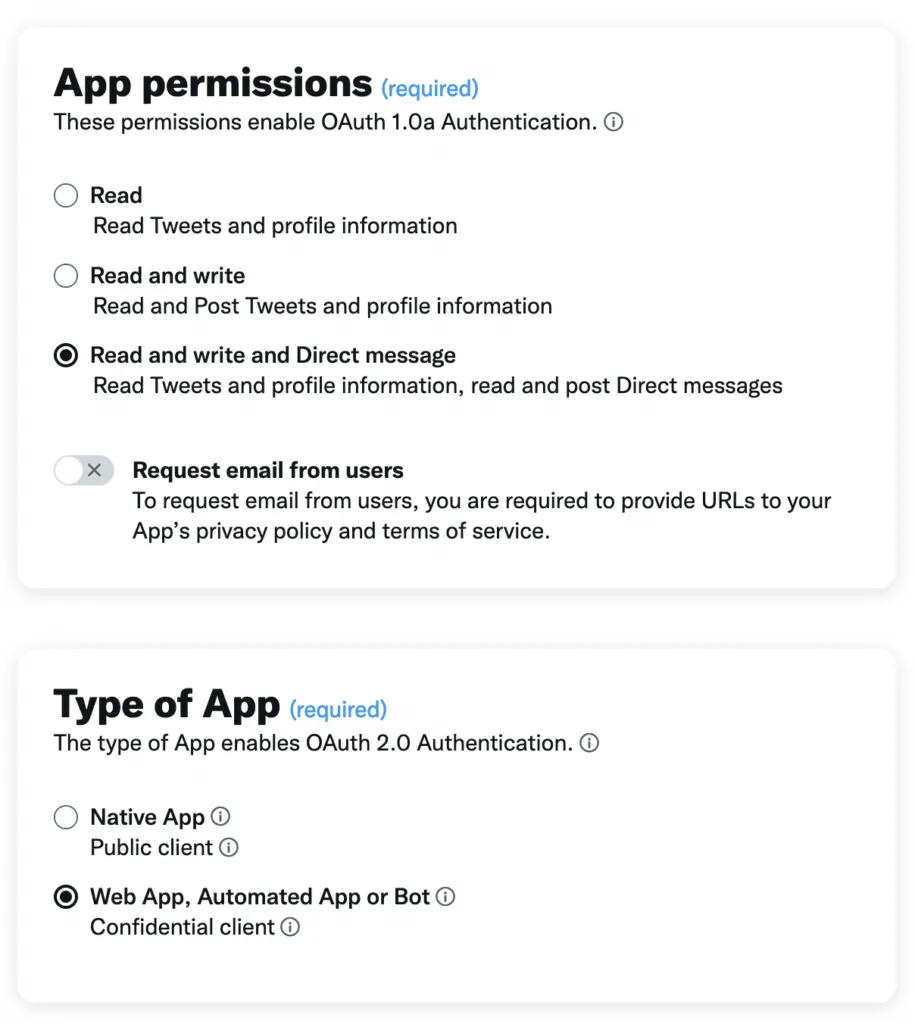
At the bottom of the Settings page there is the User authentication settings section. You need to enable user authentication (OAuth2.0) to use the Account Activity API. Enter the user auth setup, and you should see a form that looks like the screenshot below. For App permissions you want to tick Read and write and Direct message, and for Type of App you want to tick Web App, Automated App or Bot.
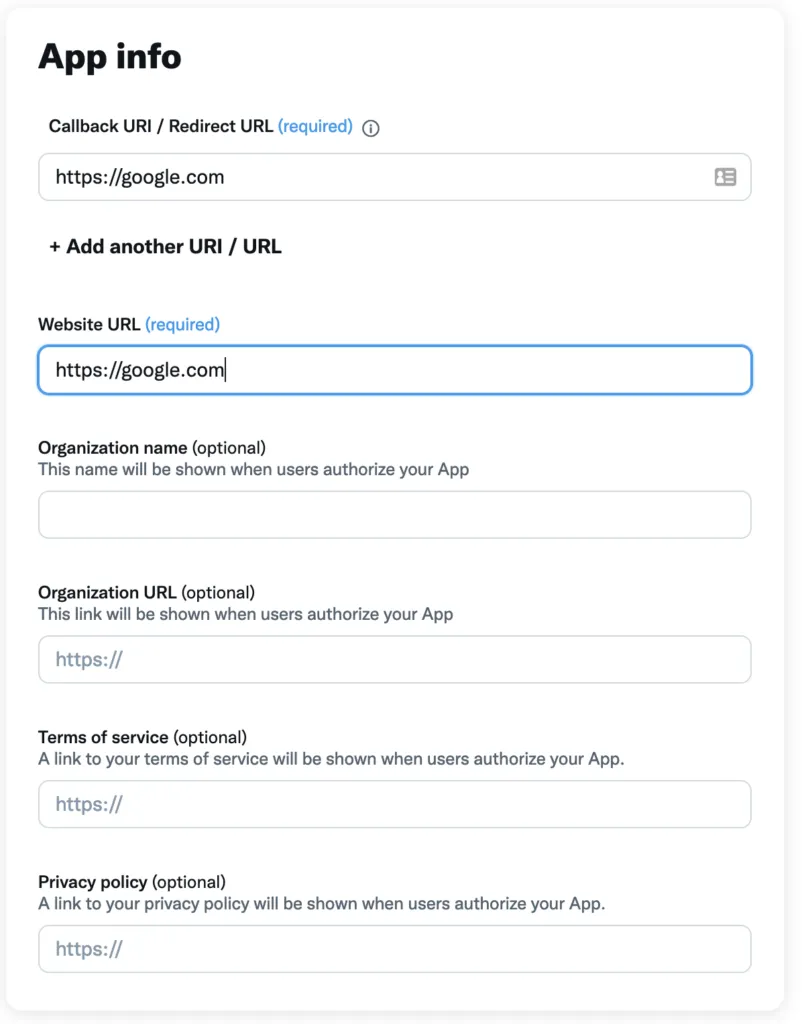
Below this you will have a form asking for URLs. For now, just add https://google.com as the Callback URI and Website URL values.
Save the settings.
Next, go to the Key and token page of your App. You are going to want to generate the Consumer Keys and OAuth 2.0 Client ID and Client Secret, make sure you note all these values down (and note which key is which!).
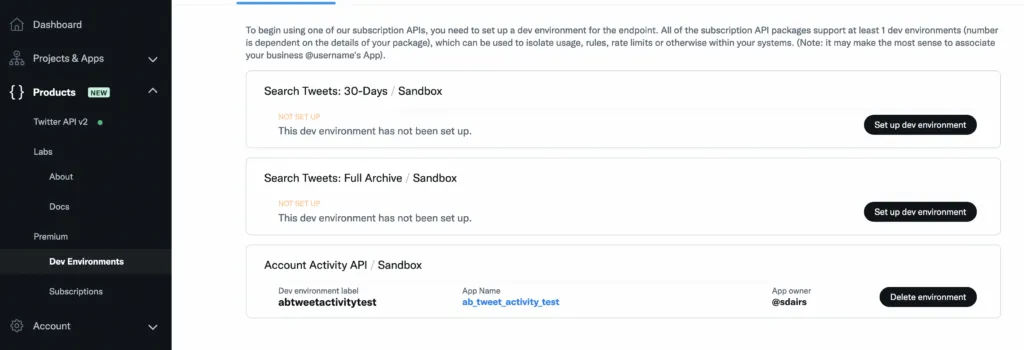
Next, you need to setup the Twitter development environment. In the Developer Portal side menu, go to Products > Premium > Dev Environments and find the Account Activity API / Sandbox at the bottom of the page, click the Set up dev environment button. Pick a unique label (name) for the env, and select the App you created from the drop down.
With that done, we next need to create the account subscription which can only be done via the Twitter API.
You can do this via cURL, but there is a utility called twurl which makes authenticating against the Twitter API a bit easier. See the instructions for twurl here. If you’re on a Mac, you should just be able to run gem install twurl and you’re good to go.
You need to auth using your Consumer Keys first.
twurl authorize -c <consumer-key> -s <consumer-secret>Then you need to do the user auth with OAuth…When you run the command, you will need to follow a link in your browser and grant access, which returns a OAuth token to twurl.
twurl authorize -u <your twitter username>There is one more step with twurl to complete the setup, but we need to build our CRC endpoint first, so we’ll come back and finish the Twitter config at the end.
Implementing the CRC endpoint
I covered the background for setting up a CloudFlare worker in the last post but here’s the steps again quickly.
Get the Cloudflare Worker CLI, Wrangler, installed.
npm install wrangler --save-devAuthenticate Wrangler with your Cloudflare account.
wrangler loginMove to the directory you’ll be working in and init a new Worker project using Wrangler.
wrangler init twitter-crcYou should now have a skeleton Workers project ready to go. I am using TypeScript.
export interface Env {}

export default {
  async fetch(
    request: Request,
    env: Env,
    ctx: ExecutionContext
  ): Promise<Response> {},
};
All of the work will be inside this fetch method.
Before we start writing the code, we are going to need our Consumer Secret to answer the CRC, so lets create a secret environment variable for it. Run the following command and, when prompted, paste in your Consumer Secret.
wrangler secret put TWITTER_CONSUMER_SECRETOn to the code. Twitter’s CRC requests will always be using the GET method, so let’s first check that the request is a GET.
export interface Env {}

export default {
  async fetch(
    request: Request,
    env: Env,
    ctx: ExecutionContext
  ): Promise<Response> {
    if (request.method === "GET") {
    }
  },
};
Next, we’ll get our consumer secret from the envvar we set up before.
export interface Env {}

export default {
  async fetch(
    request: Request,
    env: Env,
    ctx: ExecutionContext
  ): Promise<Response> {
    if (request.method === "GET") {
      const consumer_secret = env.TWITTER_CONSUMER_SECRET;
    }
  },
};
If you take a look at the Twitter CRC docs, you’ll see that we should expect a query parameter on the incoming GET request called crc_token.
When a CRC is sent, Twitter will make a GET request of your web app with a ;
crc_tokenparameter.
So, let’s get the crc_token parameters from the incoming request URL.
export interface Env {}

export default {
  async fetch(
    request: Request,
    env: Env,
    ctx: ExecutionContext
  ): Promise<Response> {
    if (request.method === "GET") {
      const consumer_secret = env.TWITTER_CONSUMER_SECRET;
      const { searchParams } = new URL(request.url);
      let crc_token = searchParams.get("crc_token");
    }
  },
};
Because we are legit engineers, we’ll make sure we actually found that parameter, and return an error if not.
export interface Env {}

export default {
  async fetch(
    request: Request,
    env: Env,
    ctx: ExecutionContext
  ): Promise<Response> {
    if (request.method === "GET") {
      const consumer_secret = env.TWITTER_CONSUMER_SECRET;
      const { searchParams } = new URL(request.url);
      let crc_token = searchParams.get("crc_token");

      if (crc_token == null)
        return new Response("Must provide a CRC Token", { status: 400 });
    }
  },
};
The next bit is a little cryptic. That’s a pun, because it’s cryptography, but it’s also a bit bananas to understand if you’re not familiar with this stuff.
Node.js has a bunch of fun stuff in its cryptography libraries that would make this much easier, but at the time of writing, using Node.js in CloudFlare Workers isn’t great…so I spent a while working out how to do this with the standard JavaScript Web Crypto API. I ended up finding most of the answer burried in a StackOverflow thread.
The Web Crypto API is asynchronus, which means everything is a super-fun bundle of Promises and I wanted to cry. Lots of async and await coming up.
I’m not going to explain it line by line; in short, this creates a base64 encoded HMAC SHA-256 hash created from the crc_token and your Consumer Secret.
export interface Env {}

export default {
  async fetch(
    request: Request,
    env: Env,
    ctx: ExecutionContext
  ): Promise<Response> {
    if (request.method === "GET") {
      const consumer_secret = env.TWITTER_CONSUMER_SECRET;
      const { searchParams } = new URL(request.url);
      let crc_token = searchParams.get("crc_token");

      if (crc_token == null)
        return new Response("Must provide a CRC Token", { status: 400 });

      let digest = await (async () => {
        "use strict";

        let secret = consumer_secret;
        let enc = new TextEncoder("utf-8");
        let body = crc_token;
        let algorithm = { name: "HMAC", hash: "SHA-256" };

        let key = await crypto.subtle.importKey(
          "raw",
          enc.encode(secret),
          algorithm,
          false,
          ["sign", "verify"]
        );
        let signature = await crypto.subtle.sign(
          algorithm.name,
          key,
          enc.encode(body)
        );
        let digest = btoa(String.fromCharCode(...new Uint8Array(signature)));

        return digest;
      })();
    }
  },
};
The Twitter CRC expects a HTTP 200 reponse with a JSON payload that looks like this:
{
  "response_token": "sha256=xxx"
}
So let’s send that response.
export interface Env {}

export default {
  async fetch(
    request: Request,
    env: Env,
    ctx: ExecutionContext
  ): Promise<Response> {
    if (request.method === "GET") {
      const consumer_secret = env.TWITTER_CONSUMER_SECRET;
      const { searchParams } = new URL(request.url);
      let crc_token = searchParams.get("crc_token");

      if (crc_token == null)
        return new Response("Must provide a CRC Token", { status: 400 });

      let digest = await (async () => {
        "use strict";

        let secret = consumer_secret;
        let enc = new TextEncoder("utf-8");
        let body = crc_token;
        let algorithm = { name: "HMAC", hash: "SHA-256" };

        let key = await crypto.subtle.importKey(
          "raw",
          enc.encode(secret),
          algorithm,
          false,
          ["sign", "verify"]
        );
        let signature = await crypto.subtle.sign(
          algorithm.name,
          key,
          enc.encode(body)
        );
        let digest = btoa(String.fromCharCode(...new Uint8Array(signature)));

        return digest;
      })();
      return new Response(
        JSON.stringify({ response_token: `sha256=${digest}` })
      );
    }
  },
};
Finally, let’s return a HTTP405 if the request was not a GET. This is the complete code.
export interface Env {}

export default {
  async fetch(
    request: Request,
    env: Env,
    ctx: ExecutionContext
  ): Promise<Response> {
    if (request.method === "GET") {
      const consumer_secret = env.TWITTER_CONSUMER_SECRET;
      const { searchParams } = new URL(request.url);
      let crc_token = searchParams.get("crc_token");

      if (crc_token == null)
        return new Response("Must provide a CRC Token", { status: 400 });

      let digest = await (async () => {
        "use strict";

        let secret = consumer_secret;
        let enc = new TextEncoder("utf-8");
        let body = crc_token;
        let algorithm = { name: "HMAC", hash: "SHA-256" };

        let key = await crypto.subtle.importKey(
          "raw",
          enc.encode(secret),
          algorithm,
          false,
          ["sign", "verify"]
        );
        let signature = await crypto.subtle.sign(
          algorithm.name,
          key,
          enc.encode(body)
        );
        let digest = btoa(String.fromCharCode(...new Uint8Array(signature)));

        return digest;
      })();
      return new Response(
        JSON.stringify({ response_token: `sha256=${digest}` })
      );
    }
    return new Response("Nope", { status: 405 });
  },
};
And that’s all there is to the code!
Push this to CloudFlare with wrangler.
wrangler publishMake a note of the Worker URL that you get from the output of the publish command.
Either via cURL or your browser, hit your new Worker URL. Without the crc_token paramter you should get our HTTP400 response.
curl -XGET https://twitter_crc.my_cloudflare.worker.devThen try it with the crc_token parameter, just give it any random value.
curl -XGET https://twitter_crc.my_cloudflare.worker.dev?crc_token=fooYou should get a HTTP200 with a response like this.
{ "response_token": "sha256=KY6N3m3v34/7fwfoAJClxDgP/QtpG0nogIr5siePfwU=" }Finish Twitter API config
Go back to the Twitter Developer Portal. On the side bar, navigate to Projects & Apps > your_app_name > Settings and at the bottom, find the User authentication settings section and click Edit.
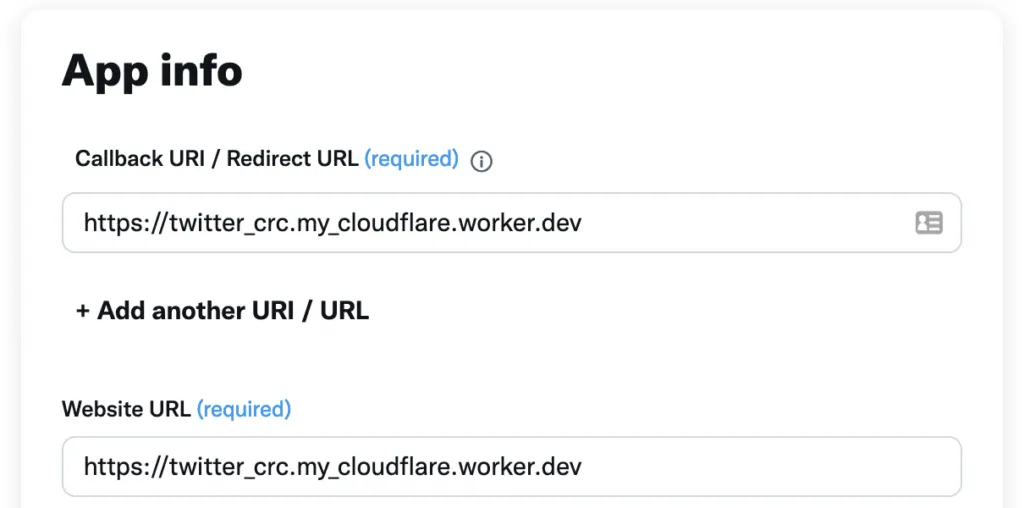
Modify the two URLs that we set to https://google.com before, and replace them with your CloudFlare Worker URL. Don’t forget to Save.
If that all went well, we can register the webhook & create the subscription to our account. So let’s go back to the twurl stuff we set up earlier, for the final bit.
First, you need to register the weebhook URL. Note: You must URL Encode your Webhook URL, you can Google ‘URL Encode’ and you’ll get some webtools that can give you the URL encoded string.
The
twurl -X POST "/1.1/account_activity/all/<your env name>/webhooks.json?url=<your worker url>" -u <your username> -c <your consumer key> -s <your consumer secret>Next, add the subscription to your user.
twurl -X POST "/1.1/account_activity/all/<your env name>/subscriptions.json" -tj -u <your username> -c <your consumer key> -s <your consumer secret>The errors returned by this command are pretty rubbish. If it didn’t work, you’ll probably see something like this:
{"errors":[{"code":215,"message":"Bad Authentication data."}]}It’s not very descriptive. To help debugging, you can add console.log() lines into your CloudFlare Worker, which you can tail from the command line with:
wrangler tailWith any luck, it’ll JustWork™️ and you should get a success response.
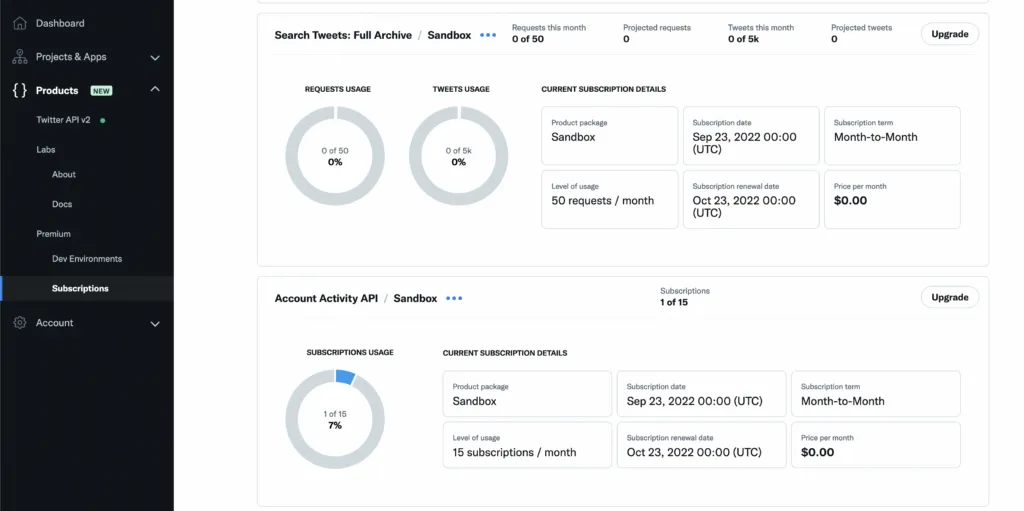
You can also validate this has worked by going to the Developer Portal, in the side bar to Products > Premium > Subscription and then at the bottom of the page, you should see that you have 1 active subscription for the Account Activity API.
Now what do?
Well, all of your Twitter activity will now be sent to your webhook. It’ll go to the same Worker we just created, but as a POST request.
At the top of our fetch function we checked if the request was a GET method. You can add an else condition that checks for a POST, which will catch all of the requests containing your Twitter activity. You could also write completely separate Workers to handle the CRC & activity requests.
You can find more detail about what those POST requests contain in the Twitter docs.
I’ll eventually follow up with Part 2 to this post which will cover handling those POST requests and sending the activity to Tinybird.